


11308647
Service
Service Kits
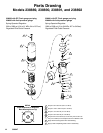
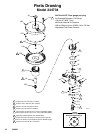
For the Fluid Diaphragm Repair Kit, order Part 238747.
Parts included in this kit are marked with an asterisk,
for example (7*), in the Parts Drawings and Lists on
pages 14 and 16.
For the Cartridge Repair Kit, order Part 238748 for all
models except 248090. Parts included in this kit are
marked with a dagger, for example (3{), in the Parts
Drawings and Lists on pages 14 and 16.
For the Cartridge Repair Kit for 248090, order Part
248098. Parts included in this kit are marked with a
checkmark, for example (3n), in the Parts Drawings
and Lists on pages 14 and 16.
To convert from a spring-operated to an air-operated
regulator, order the Air-Operated Conversion Kit, Part
238749. Parts included in this kit are marked with a
double dagger, for example (37}), in the Parts
Drawings and Lists on pages 14 and 16.
NOTE: To convert from a medium-pressure-range,
spring-operated model to a high-pressure-range,
spring-operated model (or vice versa), order the
appropriate spring (11) from the Parts List on
page 15.
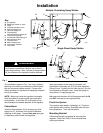
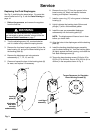
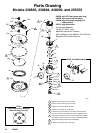
Installing the Air-Operated Conversion Kit
(See Parts Drawings on pages 14–16)
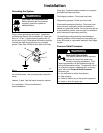
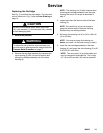
1. Relieve the pressure.
WARNING
To reduce the risk of serious injury whenever you
are instructed to relieve pressure, always follow the
Pressure Relief Procedure on page 7.
2. On the spring-operated regulator, turn the
adjusting screw (10) counterclockwise until it is
loose enough to fully relieve the spring tension.
3. Use a strap wrench or an equivalent wrench to
loosen and remove the spring cover (2), spring
retainers (6 and 27), and spring (11).
4. Place the stabilizing spring (22) of the air-operated
regulator on the piston rod (6). Install the
conversion kit assembly onto the backing plate (8).
Torque to 15 to 20 ft-lb (20 to 27 NSm).
5. Plumb an air line up to the 1/4 npt(m) threads of
the nipple (35) on the air regulator.
6. Flush the system (see page 9), and set the
regulator pressure by following the procedure in
Adjusting the System Pressure on page 8.