


Repair
15
Replace the Diaphragms
Disassembly
1. Prepare the pump for repair, page 14.
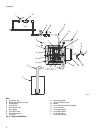
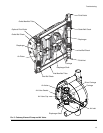
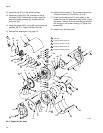
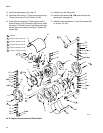
2. Remove the screws (31) from one fluid cover (1).
Pull the cover assembly off, separating it from the
fluid tubes (12). See FIG.6.
3. Remove the fluid tubes (12) from the other cover
assembly.
4. Remove the screws (31) and the remaining fluid
cover (1).
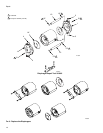
5. Install diaphragm (14) using the diaphragm repair
tool to force the shaft all the way to one side. Press
the short, wide boss on the tool directly on the dia-
phragm. The part number on the tool should face
away from the pump. See FIG.6.
6. Unscrew the opposite diaphragm (14) from the shaft
by turning it counterclockwise by hand.
7. Push the shaft in the opposite direction by installing
the diaphragm repair tool on the opposite side of the
pump. Press the tall boss on the tool directly on the
pump shaft. The part number on the tool should
face toward the pump. See FIG.6.
8. Unscrew the remaining diaphragm (14) from the
shaft by turning it counterclockwise by hand.
Reassembly
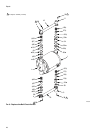
1. While the diaphragm repair tool holds the shaft to
one side, screw the new diaphragm (14*) into the
shaft by hand. See FIG.6.
2. Depress the first diaphragm (14*) using the dia-
phragm repair tool and install the opposite dia-
phragm (14*) by hand.
3. Remove the o-rings (13) from the fluid tubes (12)
and replace with new o-rings (13*) from the kit.
4. Install the cover assembly that has the tube hous-
ings (4) attached. The arrow must point toward the
top of the pump and the air inlet (40) must be to the
right of the cover (1). Torque the screws (31) to 20
N•m (15 ft-lb).
5. Lubricate the o-rings (13*) and ends of the fluid
tubes (12) and push the tubes into the tube hous-
ings (4) so they are securely seated.
6. Install the cover assembly that has the fluid inlet (3)
and outlet (2) housings attached. The arrow must
point toward the top of the pump. Seat the cover
securely on the fluid tubes (12). Torque the screws
(31) oppositely and evenly to 20 N•m (15 ft-lb).
Diaphragm Repair Kit 243152 is available. Parts
included in the kit are marked, for example (14*).
For the best results, replace both diaphragms and
all o-rings (13*).
Diaphragm Repair Tool 261695 is available to
assist with diaphragm installation.
Operating the pump beyond the maximum air
input pressure will decrease diaphragm life.
Do not operate the pump dry for long periods of
time to avoid reducing diaphragm life.