


Repair
21
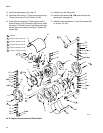
Replace the Cylinder and Piston
Seals
Disassembly
1. Prepare the pump for repair, page 14.
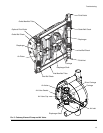
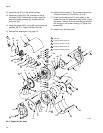
2. Remove the screws (38) and tube assemblies. See
FIG.9.
3. Disassemble the ball check valves, page 19. The flat
seals (55, 59) are included with this repair kit.
4. Remove the air inlet fitting (40).
5. Remove the screws (68) and the top (67) and bot-
tom (66) covers.
6. Remove the screws (31) and fluid covers (1).
7. Remove the diaphragms (14), page 15.
8. Remove the four screws (38) and washers (37), the
air valve cover (36), and the gasket (35).
9. Pry the air valve seat (33) out of the center housing
(5), using two screwdrivers inserted in the recesses
on the seat.
10. Remove the o-rings (80) from the housing.
11. Remove the cup (47) from the housing.
12. Remove the two clips (46) from the shaft (17).
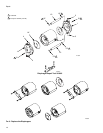
13. Remove the screws (30), cylinder outer cover (11),
cylinder (7), and cylinder o-rings (22). Inspect the
inner wall of the cylinder for damage.
14. Pull the piston (16) and shaft out of the center hous-
ing (5). Remove the piston o-ring (23), quad ring
(32), and packing (26). Inspect the piston and shaft
for damage. If these parts need replacement,
unscrew the piston shaft (15) from the diaphragm
shaft (17) and remove the piston (16).
15. Remove the screws (29) and cylinder inner cover
(6). Remove the air valve tube (24) and o-ring (25)
from the inner cover. Do not lose the o-ring (25).
16. Remove the o-rings (28, 42) from the center hous-
ing (5). Do not lose the o-ring (28).
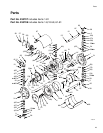
Reassembly
1. Install the o-rings (42◆, 28) in the housing (5).
2. Install the o-rings (22◆, 25) on the inner cover (6).
3. Install the o-ring (23◆), packing (26◆), and quad
ring (32◆) on the piston (16).
4. Insert the air valve tube (24) through the inner cover
(6). Install the cover on the housing (5). Seat the
tube securely in the housing, oriented with the
spring pin (27). Torque the screws (29) to 8 N•m (5.9
ft-lb).
5. If the piston (16) was removed from the piston shaft
(15), reassemble a washer (61), the piston, and
another washer on the shaft. Screw the diaphragm
shaft (17) onto the piston shaft.
6. Lubricate the shaft (17) and slide it into the housing
(5), guiding the tube (24) through the hole in the pis-
ton. Install the two clips (46) on the shaft.
7. Liberally grease the inside of the cylinder (7) and
the piston o-ring (23◆). Seat the cylinder securely
on the inner cover (6).
8. Install the o-ring (22◆) on the outer cover (11).
Install the outer cover and torque the screws (30) to
15 N•m (11 ft-lb).
9. Install the cup (47) in the center housing (5).
10. Install the o-rings (80). Check that the o-rings (43,
44) are in place on the air valve seat (33). Lubricate
the o-rings. Install the seat in the center housing (5),
oriented with the spring pin (34).
11. Install the gasket (35), cover (36), and screws and
washers (38, 37). Torque to 6 N•m (4.4 ft-lb).
Cylinder Seal Repair Kit 243155 is available.
Parts included in the kit are marked, for example
(22◆). For the best results, use all parts in the kit.
To further disassemble and repair the air valve,
see page 17.
Lubricate all o-rings during reassembly.