


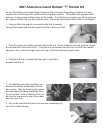
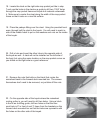


23. Through bolt the two pulleys on the inside of the kayak.
On the RIGHT side of the kayak, use the existing screws that
are being used to attach the mainsheet routing pulley line and
place nuts on the outside of the new block to hold it in place.
On the LEFT side of the kayak, use the new screws and nuts
in the kit and bolt it through the holes that you drilled. When
mounting the blocks make sure to take note that there is a
larger gap on one side of the pulley which should be located to-
ward the bow of the boat as shown in the pictures (see arrow).
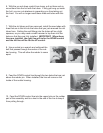
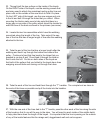
24. Locate the two line assemblies which have the webbing
scrunched along the length of the line. Take note of the sec-
tion of the line that has a longer length of line after the webbing
attached to the line.
25. Take the end of the line that has a longer length after the
webbing and feed it up through the bottom and around the
pulley. Continue to feed that line back to the tubes that you
pressed in on step 9 and 12 and feed it through the tube so
that it exits the hull. Do this on both sides of the kayak so
that both of the pulleys that you bolted to the kayak have lines
wrapping around them and coming out through the tubes.
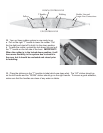
Kayak Bow
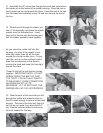
26. Take the ends of the line and feed them through the “T” handles. Tie a simple knot as close to
the ends of the lines as possible and pull the knots into the handles.
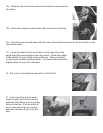
27. With the one end of the lines tied to the “T” handle, pass the other ends of the line along the side
of the kayak so that it runs all the way to the stern. You will need to reach inside of the middle hatch
to help pass them down the length of the kayak. It is important that the line is passing on the outside
of any of the inside features like the mirage well, daggerboard well and cart scuppers.