


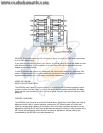

After your selection is made, the unit will return to normal operation after 5 seconds. The selected
units icon should now be visible as shown in figure 8.
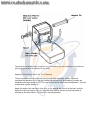
Keel Offset
The Keel Offset function adjusts the digital depth readout to display depth readings from either
the waterline of the keel (lowest point) of the boat, instead of from the location of the transducer
which is usually somewhere in between. This permits optimum transducer location and depth
readouts suited to your needs.
To determine the value to enter into the Keel Offset setting, first decide whether depth from the
waterline or depth from the keel is desired. Measurements will need to be made for the location
desired.
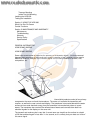
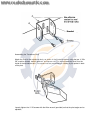
For depth from the keel of the boat, accurately measure the vertical distance between the face of
the transducer and keel of the boat. This measurement will then be entered into the Keel Offset
function as a negative (-) number. (Figure 9).
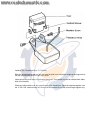
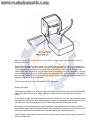
For depth measurements from the waterline, accurately measure the vertical distance between
the face of the transducer and the waterline of the boat. This measurement will then be entered
into the Keel Offset function as a positive (+) number (Figure 10).
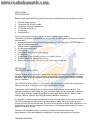
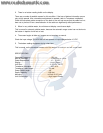
To enable Keel Offset press SET until the KO icon is displayed on the screen. The default setting
of the unit is off which is displayed as zero. From the default setting of 0.0, use the DOWN arrow
to enter the negative (-) number to set the unit for depth from the keel. Or from the default setting
of 0.0, use the UP arrow to enter a positive (+) number to set the unit for depth from the waterline.
The available settings are +10 to –10 feet. After your selection is made, the unit will return to
normal operation after 5 seconds. The “KO” icon should now be visible as shown in figure 13.
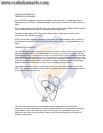
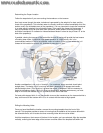
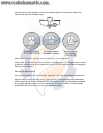
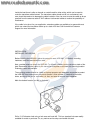
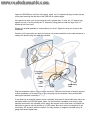
Figures 11, 12, and 13 depict a scenario where the KEEL OFFSET has been set to –2 feet.
Figure 13 shows the return to normal operation with the updated depth readout.
MAINTENANCE AND WARRANTY
TROUBLESHOOTING
Do not attempt to repair the HDR 600 yourself. There are no user serviceable parts inside, and
special tools and techniques are required for reassembly to ensure the waterproof integrity of the
housing. Repairs should be performed only by authorized Humminbird technicians.
Many requests for repair received by Humminbird involve units that do not actually need repair.
These units are returned “no problem found”. If you have a problem with your HDR 600, consult
the following troubleshooting guide before calling Customer Support or sending your unit in for
repair.
1. Nothing happens when I turn the unit on.
Check the power cable connection at both ends. Be sure that the cable is connected correctly to
a reliable power source- red lead to positive, black lead to negative ground. Ensure that the
power available at the mount is between 10 and 16 VDC. If the unit is wired through a fuse panel,
ensure that the panel is powered. Often accessory fuse panels are controlled by a separate
switch or the ignition switch. Also, often a fuse can appear to be good when in fact it is not. Check
the fuse with a tester or replace it with a fuse known to be good.