


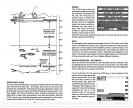


the AUTO
key again
to
switch it. Press the CLEAR
keyto
erase the AUTO!
_________________
________________
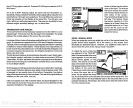
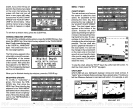
shown
at twice the size as
the
MAN
menu.
All of
the X-55A's features
adjust
the same with the Broadview on.
Sensitivity, Range, Grayline®and
all the others
adjust eitherusing
thefront
panel
buttons
orthrough
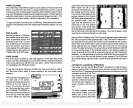
menu selections. The
onlydifference
is when two
charts are
showing
on the
display
at the same time. You will
get
a new
menu,
letting you
switch between charts. This
gives you
the
abilityto
have
different
ranges, sensitivity settings, etc.,
on each chart.
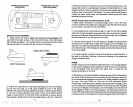
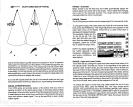
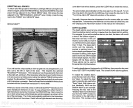
TRANSDUCER CONE
ANGLES
The sound waves from the transducer
spread
out into the water in a cone
shaped
beam. This looks much like
the beam
from a
flashlight.
The
angle
between the outside
edges
of the cone is the cone
angle.
Lowrance
offers
achoice of transducerswith eitheran
8 or2O
degree
cone
angle. ThetransducersuppliedwiththeX-55A
hasa2o
degree
cone
angle.
Typically,
wide cone
angletransducers (20 degrees)
are ideal
foroperating
in shallow to medium water
depths.
The 20
degree
cone
angle
allows
you
to see more of the underwaterworid. In 1 5feetof waterthe2o
degreecone
covers an area about sixfeet across. The B
degree
transducercovers
only
about a two foot circle.
The 20
degree
transducer is almost
always
the best to use in fresh
water,
thea
degree mostly
in salt water. In a
deep
water
environment,
(300
feet
-
freshwater,
1 Oofeet-
saltwater)
the
narrowconeangle
is more desirable.
Since the sound
energy
is concentrated in a
smallerarea,
it can
penetrate
to much
deeper depths.
Both 8
degree
and 20
degree
transducers
give
accurate bottom
readings,
even
though
the bottom
signal
is much
wide!
on the 20
degree
model. This
is because
you
are
seeing
more of
the
bottom.
Remember,
the shallow
edge
of the
signal
shows
you
the true
depth.
The rest of the
signal
tells
you
whether
you
are over
rocks,
mud,
etc.
if the cone
passes
over a fish in shallow
water,
the
signal displayed
on the
X-55A
may
not arch at all. This is due to the narrow cone diameter and the
resolution limitations of the
display.
ones on the
right.
The echoes
that
scroll across the screen
are the exact
same echoes
on
both sides of the screen.
They're simplyenlarged
on
the
left side. This feature tracks
the
bottom,
keeping
it on the
display
at all
times,
when the
automatic feature is on. Once
you've
set the zoom as de-
sired,
press
the CLEAR
keyto
erase the menus.
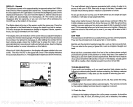
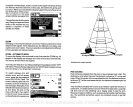
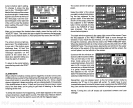
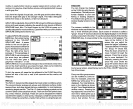
ZOOM
-
MANUAL MODE
When
you press
the zoom
key
while the unit is in the manual
mode,
the
screen shown below
appears.
All of the menus on this screen work
identically
as described above.
However,
one additional menu item is
shown when the unit is in the manual mode: "ADJUST".
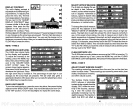
To
adjust
the
zoom, press
the
key adjacent
to the "ADJUST"
label. A screen similartothe one
below
appears.
A zoom bar and
adjust
arrows
appear
on the
screen. The echoes on the left
side of the screen
are the
ones
that
appear
between the
top
and
the bottom of the zoom bar.
Pressthe
up
ordown
arrow
keys
to move the zoom bar
up
or ___________
down. As
you adjust
the zoom
bar,
the echoes move on the left side of the screen at
the same time. The
zoom
adjust
menus will
automatically
clear a few seconds after
you've
pressed
the last
key.
Remember,
the X-55A won't track the
bottom when
it's in the manual mode.
36 17
PDF compression, OCR, web-optimization with CVISION's PdfCompressor