


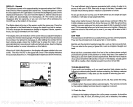
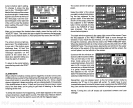

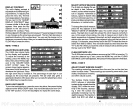


current
shallow alarm
setting.
To
change
it,
press
the
key
next
to the "CHANGE LIMIT"
label atthe bottom of the screen
as shown at
right.
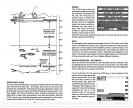
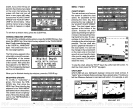
Anewscreen
__________
appears
as shown at the
top
of
the next
page.
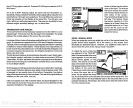
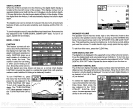
Use the num-
bered
keypad
on the
right
side
of the
unit to enter the shallow
_________
alarm
setting.
We used 10 feet
________
in
this
example.
_________
___________
After
you've
entered the desired alarm
depth, press
the
key
next to the
"ACCEPT'
label. This enters the alarm
depth
into
memory
callytums
the shallow alarm on. Now
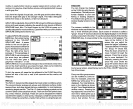
press
the
key
next to
label.
The screen shown at
right ap-
pears
next. The shallow alarm
is now set. If the bottom
goes
shallower than 10
feet,
the
alarmwill sound and
awarning
message appears
on the
screen at the same time. A
label also
appears letting you
mute the
alarm,
if desired.
To
return to the sonar
screen,
r
press
the
keynexttothe
"EXIT'
label.
—
E!LOWOrF
10
—
DEEP
OH 1UO
ALARM MUTE
When eitherthe shallow or
deep
alarm
is
triggered,
an audio tone sounds.
A differenttone soundsforthe shallowthan the
deep alarm,
thus
letting you
know which alarm is
sounding
without
looking
at the unit.
Once a
depth
alarm is
triggered,
it
keeps sounding
until
you change
depth.
For
example,
if the shallow alarm is set to 10
feet,
and
you
move into and
stay
in water
that's five feet
deep, you're going
to
get
tired of
listening
to the alarm
beeping
all the time.
To
keep
this situation
from
happening,
a new label
appears
on the sonar
screen whenever a
depth
alarm sounds. This label
says
"Silence Alarm".
This "mute?
or
turns
the alarm's sound off until it's
triggered again.
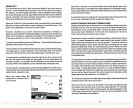
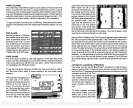
Select the letter of the
group
you
wish to customize
by press-
ing
the
key adjacent
to the
group's
label. If the label isn't
shown
on this
page, press
the
key
adjacent
to the "MORE"
label.
In
this
example,
the
key
next to the
"GROUP A" label
was
pressed.
The screen
shown below
appears.
ET
POUPS
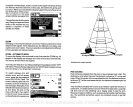
The
depth
window
appears
in the
upper right
corner of the screen. Press
the
key
adjacent
to the
"NEXT WINDOW" label to move
through
the
windows. If
you
reach
the last
window,
or if
you
wish to
go
backwards
through
the
windows, press
the
key
next to the "PREy WINDOW"
label.
When the desired
window is on the
screen,
press
the
key
next to the
"USE
WINDOW" label. The screen
clears, placing
the new
window in the
upper
left
corner of the screen. If the new window takes
up
half the
screen,
the
unit will
place
it on the left side of the screen.
Continue with the
window se-
lections until the screen isfilled.
The unit will
stay
in the win-
dows mode
using your
new
customized
screen. If
you
don't
want to
fill a screen and
only
use
one, two,
orthree
windows
in a
group, simply
press
the
key adjacent
to the
"STOP"
label. This savesthe
group
and
exitsthemodifywindows
mode.
IND0W
Iii
Remember,
you
can
always
return to the
full screen sonar mode
by
pressing
the "0"
key
in
the
upper
left corner. To switch back to
your
customized screen fromthefull
screen
sonar, simply pressthe
WINDOWS
key,
then
use the down arrow
key
to switch to the
group you
customized.
NOTE:
Turning
the unit off erases all customized
screens and user
settingsl
20 33
The screen shown at
right ap-
pears.
IUSE
NUMERIC KEYS
TO
I
CHAHISE VALUE.
USE
I
I
RISHT
ARROW TO
IH
BACKSPACEI
U
NEW
VALUE: 10
..jAccEPT
GROUP
Afl
SELECT GROUP E:
GROUP
r%*t
'GROUP
B
TO BE
GR0UP F
GROUP 6ROUP
and automati-
the "ACCEPT"
PDF compression, OCR, web-optimization with CVISION's PdfCompressor