


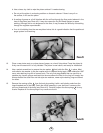
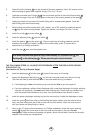

5. Screw the orifice housing onto the threads of the lever assembly. Use a 3/4" wrench on the
orifice housing to tighten them together snugly (70 in. lbs, 7.8 nm).
6. Lubricate and install new O-rings from the annual service kit onto the orifice housing .
Note that the larger of the two O-rings goes on the end of the housing closest to the case .
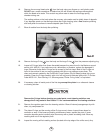
7. Lightly lubricate the inner bore of the swivel fitting with a recommended grease. Install the
swivel fitting onto the orifice housing.
8. While holding the orifice housing with a 3/4" wrench, use a 5/8" wrench to install the retainer
nut onto the orifice housing thread. Tighten the retainer, nut snugly (70 in lbs, 7.8 nm).
9. Install the cir-clip onto the orifice .
10. Install the adjusting knob onto the orifice .
11. Install the washer onto the screw . Place a small drop of locking adhesive onto the
threads of the screw, and install it snugly into the orifice using a size "0" square drive
screwdriver or a Phillips screwdriver.
12. Install the cap back onto the adjuster knob.
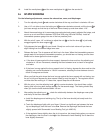
THE FOLLOWING STEPS (13 -18) MUST BE PERFORMED AFTER THE REGULATOR SECOND
STAGE IS SET Up.
(See Section 6.5, Set-Up of Second Stage).
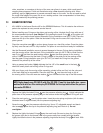
13. Install the diaphragm into the case so that it sits evenly on the ledge.
14. Inspect the diaphragm retaining ring . You will see a long tab and a short tab on the ring.
The short tab lines up with the short notch in the case when the ring is installed.
a. If the diaphragm is
blue, the retaining ring must also be blue to give the proper fit.
b. If you are replacing a white or black diaphragm with a new blue diaphragm, the black retaining
rings will not fit properly. You
must use a blue retaining ring! These rings are available from
your Sherwood Scuba distributor at no cost. You should always have several on hand.
15. Install the proper diaphragm retaining ring into the case so that it holds the diaphragm in place.
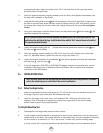
16. Install the cover onto the case by first hooking the bottom section over the exhaust valve
area, and then working the rest of the up and over the front section. Work the cover around
with your hands until everything is in place.
17. Using a size "0" square drive screwdriver or a Phillips screwdriver, install the cover retaining
screws through the screw holes in the cover and into the holes in the case.
Do not
overtighten!
These screws are threading into plastic, which will hold well in service but is easily
stripped if the screws are overtightened.
16
NOTE: Do not allow lubrication (grease on finger, silicone overspray, etc.) to get on the case , the
diaphragm , or the retaining ring . This may cause these parts to slip or deteriorate.
13
11 12
13
17
6
5
10
4
10
3 2
8
18
19
17
18
17
19
21
20