


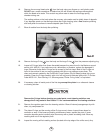


18. Install the mouthpiece and the new mouthpiece tie from the service kit.
6.4 SET-UP OF SECOND STAGE
For the following adjustments, remove the exhaust tee, cover, and diaphragm.
1 Turn the adjusting knob out counter-clockwise all the way, and then in clockwise 1/8 turn.
2. Use a 1/4" nut driver to turn the locking nut counter-clockwise outward, until the lever is
just loose enough so that the tip of the lever moves loosely up and down about 1/16".
3. Attach the second stage to its accompanying overhauled and properly adjusted first stage, and
mount on an air tank filled to between 2700 and 3500 psig (186 and 240 Bar). Install an
intermediate pressure gauge into one of the low pressure ports.
4. With the air off, use a 1/4" nut driver to adjust the nut so that the lever is just barely
snugged against the lever support .
5. Fully depress the lever with your thumb. Slowly turn on the tank valve until you hear a
slight hissing from the second stage lever area.
6. Release the lever. The air pressure will build up in the hose. When the intermediate pressure
gauge reads full and proper intermediate pressure, you should hear no hissing, and the lever
should not be loose against the lever support.
a.. If the lever is loose against the lever support, depress the lever and turn the adjusting nut
clockwise in 1/8 turn increments, releasing the lever between turns to check for snugness
and leaks.
b. If the lever is snug against the lever support but air is hissing, depress the lever and turn the
adjusting nut counter-clockwise in 1/8 turn increments, releasing the lever between turns to
check for snugness and leaks.
7. When you find the point where the lever is snug against the lever support with no hissing, turn
the air on fully and depress the lever several times to work the parts in. The regulator should
not hiss after this working-in. If it does hiss, repeat Steps 6a and 6b above.
8. With the air on, turn the adjusting knob fully counter-clockwise. You should hear a slight
hissing (this is the long term storage position for the second stage). The hissing should stop
when you turn the knob clockwise about 1/8 turn.
9. After setting the adjusting nut , check the relationship between the diaphragm wear plate
and the tip of the lever assembly.
a. Install the diaphragm and retaining ring. The tip of the lever should just barely touch the
diaphragm.
b. Touch the diaphragm lightly with your finger. If there is a significant gap between the lever
tip and diaphragm, then the lever is too
low. Remove the diaphragm and bend the lever
slightly upward with Sherwood's Lever Bending Tool (p/n 4005-16).
c. If the regulator hisses slightly when the air is turned on, but stops hissing when you remove
the diaphragm, then the lever is too
high. Use Sherwood's Lever Bending Tool to bend the
lever slightly downward.
17
14
15
4
29
26
29 27
26
27
4
29