


Remote Proportioning Valve Chapter 4: Installation 12 of 30
Chapter 4: Installation
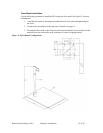
4-1 Mounting the RPV
The RPV can be mounted to a machine, on the floor, or on a wall. The optional floor stand
provides installation location flexibility. The RPV can be used with more than one machine
by switching hoses and positioning the floor mounted RPV in a convenient place.
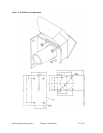
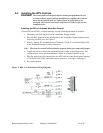
Wall Mount Installation
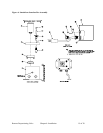
This type of installation uses the optional wall mounting bracket to mount the Remote
Proportioning Valve to a convenient wall, pipe, or other structural member. Use the
following procedure to install the RPV using the wall-mount configuration: (See Figure 1 for
more information.)
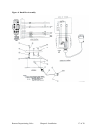
1. Select a location for the RPV that allows access to the clean-out and viewing hatch.
Plan ahead for a spot where the two material supply hoses and the material delivery
hose do not interfere with your workspace or create a tripping hazard.
2. Secure the wall bracket to a suitable wall, beam, etc. that can support 250 lbs. of
weight hanging from it.
3. Prepare the RPV for installation by removing the four bolts that attach the single
outlet tube to the valve body.
Note: The outlet tube is embedded in silicone sealant and should stick to the valve
body during installation. Do not pull them apart. If the seal between the outlet
tube and the valve body fails, apply a new bead of silicone sealant before
mounting the RPV.
4. Insert the RPV outlet tube through the hole in the bracket and secure it with the
longer ¼-20 x 1” bolts and the flat and locking washers provided.
5. Connect the RPV material outlet tube to the vacuum receiver using flex hose and
hose clamps.
6. Connect the two material inlet tubes to the pickup wands with flex hose and hose
clamps.