


Remote Proportioning Valve Chapter 4: Installation 18 of 30
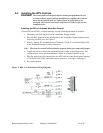
Installing the RPV-B and RPV-D Standalone for Central Vacuum Systems
This control configuration is used to convert a central system vacuum hopper into a
proportioning vacuum hopper.
The stand-alone control can be used in systems with 24 VDC or 110 VAC T-valve solenoids.
The RPV-B requires an external 110/60/1 VAC power supply. The RPV-D requires a 220/50-
60/1 power supply and the proper plug and power cable (supplied by customer). The power
supply can be provided through a grounded duplex plug or the control can be connected to a
power main (where codes permit).
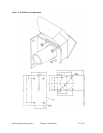
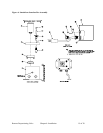
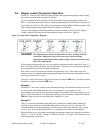
If your RPV has the RPV-B or RPV-D control package, use the following procedure to install
it: (See Figure 5 for more information.)
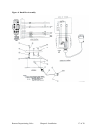
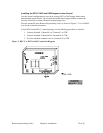
1. Remove the cover from the Standalone control enclosure. Turn it over to gain access
to the eight-pin socket at the base of the timer. (See Figure 6 on page 19.)
2. Using #14AWG leads, wire terminals three (3) and six (6) to Solenoid 1, material A,
located in the RPV. Splice the leads together within the RPV shroud.
3. Using #14AWG leads, wire terminals four (4) and five (5) to solenoid 2, material B,
located within the RPV. Splice the leads together within the RPV shroud.
4. Using #14AWG leads, wire terminals one (1) and eight (8) to the existing sequence
tee valve.
5. Replace the cover of the enclosure and tighten the screws.
Figure 5: RPV-B or RPV-D Standalone Connection Diagram