


Installation
Teledyne Analytical Instruments 15
Installation
Installation of the Series 4030 Analyzer includes:
1. Unpacking
2. Mounting
3. Gas connections
4. Electrical connections
5. Testing the system.
3.1 Unpacking the Analyzer
Although the Analyzer is shipped with all the materials you need to
install and prepare the system for operation. Carefully unpack the
Analyzer and inspect it for damage. Immediately report any damage or
shortages to the shipping agent.
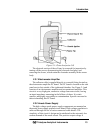
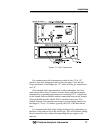
3.2 Mounting the Analyzer
The Series 4030 and the Sample Selector Unit are general-purpose
units and as such are designed with (non-sealed) enclosures. They must
be installed in an area where the ambient temperature is not permitted to
drop below 40ºF nor rise above 100ºF. In areas outside these
temperatures, auxiliary heating/cooling must be supplied. The 4030
enclosure is oil and dust resistant and although it is designed to resist
moisture, it should NOT be considered completely watertight. Mounting
to walls or racks must be made securely. Avoid locations that are subject
to extreme vibration and sway.
Sufficient space must be provided around the analyzers to
accommodate the necessary electrical conduit and plumbing connections.
The front panel must be allowed to be pulled out for possible service
access to all components of the enclosure. Refer to the system/analyzer
outline drawings for dimensions.
Note: To completely slide the Model 4030 Analyzer out of the
enclosure, pull Analyzer out until it stops, and then push down on the
release levers found almost at the end of the sliders, both sides at the
same time.