


25
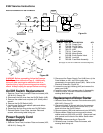
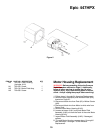
Pump Section Repair and
Service
WARNING: Before proceeding, follow the Pressure
Relief Procedure outlined on page 5. Additionally,
follow all other warnings to reduce the risk of an
injection injury, injury from moving parts or electric
shock. Always unplug the sprayer before servicing!
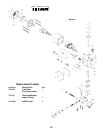
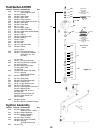
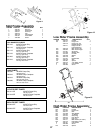
1. Remove Safety Plate (#43). Figure 6.
2. Stop the sprayer at the top of its stroke so that the
piston is in its highest position. Turn off and/or unplug
the sprayer.
3. Remove the bypass hose assembly (#341) with a
wrench and the syphon assembly (#342) by pulling up
on the hose and turn counterclockwise.
4. Tilt pump back for easy access to pump section.
SEAT SERVICE & REPAIR
The design of Titan's Epic Fluid Section allows access to
the inlet and outlet valves and seat without completely
disassembling the Fluid Section. It is possible that the
valves may not seat properly because of debris stuck in
the inlet or outlet seat. Follow the instructions below for
access to those areas.
5. Place a wrench on the Foot Valve (#323) and
unthread.
6. Clean out all debris. Examine Valve and Seat. If
damaged replace. Continue if necessary or reinstall.
7. Place a 3/4" socket on the Outlet Valve Housing and
Seat (#312) and remove.
8. Clean out all debris. Examine Valve and Seat. If
damaged, reverse or replace.
9. Reassemble and test unit. Should unit not perform
properly consult the Troubleshooting Guides on pages
13 &14 of this manual or continue with the Repair and
Packing Replacement instructions below.
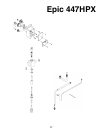
SERVICE/REPLACEMENT OF
UPPER (OUTLET) VALVE
10. To clean or replace upper valve, remove Valve
Housing (#312) while piston assembly (#315) is still
attached to pump. This will prevent the piston from
rotating.
11. Remove upper valve cage (#310) and Outlet Valve
Seat (#313) & Ball (#311). Clean and inspect along with
Housing (#312). Replace if worn or damaged. Use fine
sandpaper to remove dried paint.
12. Reattach assemblies (#309-#312) to piston #308,
and secure tightly with a wrench.
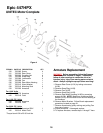
PACKING REPLACEMENT
13. Remove Outlet Mounting Bolt (#263) from rear of
pump. (As shown in Figure 8, page 22.)
14. Remove screws #306 with a 3/8" allen wrench and
slide pump section down so that the piston is clear to
slide off.
15. Inspect gasket (#268) on fitting after
removing pump section. Clean or Replace.
16. Remove Retainer (#301) and slide piston down
through pump mount assembly (#305) by lightly tapping
on top of piston assembly (#315). Clean and inspect
piston for wear. Replace if necessary.
17. Remove packings (#304 & #307) from pump housing
(#305), and replace with a new set. Always insert
packings with the raised side facing into pump
mount assembly.
18. Reattach Retainer (#301) and make sure that the
upper guide (#302) is cleaned and undamaged.
19. Insert pump housing assembly (#301, #307) into a
vise, leaving enough room to slide piston through bottom
of pump housing (#305).
20. Using the piston guide tool (#346) (included in
repacking kit) which slides over the top of the piston
assembly (#315), insert the piston through bottom of
pump housing (#305) and tap lightly with a rubber mallet
on bottom of piston until inserted.
21. Align flats on piston so that it is perpendicular to
housing (#305) and will line up when reattaching to
connecting rod. This can be achieved by rotating the
piston by placing a wrench on the valve housing
assembly (#312) and turning.
IMPORTANT: NEVER USE A WRENCH ON THE
PISTON ITSELF. THIS COULD CAUSE DAMAGE TO
THE PISTON AND CAUSE LEAKAGE.
22. Slide assembled pump housing with piston assembly
onto connecting rod and secure with screws #306.
Be certain that outlet hole is facing towards pump motor .
NOTE: Packing does not need to be adjusted.
23. Reattach outlet mounting bolt (#263) Be sure that
polyethelene gasket (#268) is in place. (See Filter
Block p. 22)
24. Reattach lower foot valve assembly (#325)
25. Reattach pump syphon tube assembly (#335), and
rotate to correct position.
26. Reattach pressure relief tube and syphon hose and
tighten securely.
NOTE: Repacking Kit (730-401) is available. For best results
use all parts supplied in this kit.