


975-0525-01-01 9
Installation
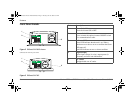
Connect the Chassis Ground
All PROwatt SW models have a chassis ground screw terminal on
the side. See “Back Panel Details” on page 5.
Follow the guidelines below to connect the inverter’s chassis to
ground.
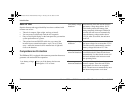
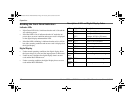
Grounding Locations
The chassis ground terminal must be connected to a grounding
point. The grounding point varies depending on where you install
the PROwatt SW. Follow the guidelines that correspond to your
type of installation.
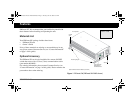
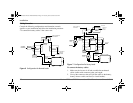
Connect The Battery Cables
To operate safely and effectively, the PROwatt SW needs proper
DC cables and DC-rated fuse(s). Because the PROwatt SW has low-
voltage, high-current input, low-resistance wiring between the
battery and the inverter is essential to deliver the maximum amount
of usable energy to your load.
WARNING: Risk of electrical shock.
Never operate the PROwatt SW without connecting it to
the ground. Electrical shock hazard could result.
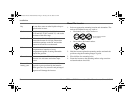
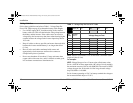
Recreational
Vehicle
Connect the chassis ground screw to the
vehicle’s chassis using a minimum 8 AWG
copper wire (preferably with green/yellow
insulation).
Fixed Location Connect the chassis ground screw to your
system’s DC grounding point using 6 AWG
wire
a
. The system’s grounding point is usually
the AC service entrance grounding point or a
separate ground rod. For a solar PV
(photovoltaic) installation, this is usually the
same rod used to ground the PV array.
a.The grounding conductor (grounding wire) should be the same wire size as the DC cables.
Important:
Use of a qualified installer strongly recommended.
PROWatt SW Inverter International.book Page 9 Tuesday, June 30, 2009 9:58 AM