


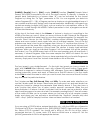
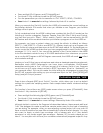

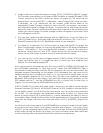
4. Assign a device to control the tempo change. [PLAY]: [CONTROL]: [PgmCtl 1] page.
This Controller Matrix allows you to assign a MIDI controller to change the Beat / Pitch
Control features of the Effect. When you select this page you will note that the
default setup is to control EFFECT 1, parameter 1, Beat Change. This is what we want.
If necessary, set it as mentioned. Set the number under Device Knob to an
appropriate Control Change number you wish to use (001, for example, would allow
the modulation wheel to change the beat). To set this device, simply press the Knob
below the word “Device” making the red arrow blink, then move the controller (mod
wheel) you want to assign. Its control change number will appear in the screen. Press
the Knob again to lock it in.
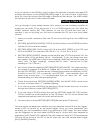
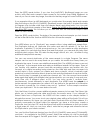
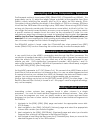
5. You can also control the Beat Change with an A3000 Knob. To do this: Select the
[UTILITY]: [PANEL PLAY]: [Knob Set] page. Set Knob #2 as follows: CTRL = ON; T-ch = 1
(transmit channel); Device = 001 (Modulation wheel, for our example).
6. Turn Knob #1 or press the 2
nd
Function button to select the [KNOB CTL] page: The
Knob Control page is where you can play the knobs. Each of the knobs will probably
have ( 1:064) above it. This would signify MIDI channel 1, value 64. The value 64 is
center for controls that run from 0-127. Values above 064 will increase the Tempo,
below will slow the Tempo, however, the pitch should remain the same!
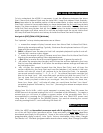
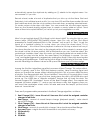
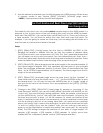
7. You can use the Function keys to trigger samples. [UTILITY]: [PANEL PLAY]: [Fkey Set]
page. Set Function key #1 to trigger the note to which you have assigned your
sample; C3 is the default assignment.
The Function buttons can send note-ons. This is set via [UTILITY]: [SYSTEM]: [KEYS] page. Set
the ASSGINABLE parameter to “Fkey Play on/off”. When the ASSIGNABLE key light is
illuminated no other functions work but the Function keys can now send note-ons to the
assigned samples. Depending on the sample LOOP parameter you can have the full
sample playback from a single touch (Shot →) or you can have it turnoff when you let
go. The samples assigned to the Function Keys will follow the amplitude envelope
generator (AEG) setting of the sample. If you want the sample to play endlessly, set the
AEG release rate to 0. Use the ASSIGNABLE key (lit) to convert the Function keys to
triggers. You can activate the ASSIGNABLE key at any time.
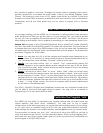
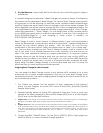
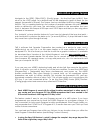
[UTILITY]: [PANEL PLAY]: [Knob Set] page. Here is where you can define control change
numbers for knobs 2,3,4 and 5, set the MIDI Channel, On/Off condition, and the Device
(or controller number). As with the Function keys above, you can set the values manually
or via MIDI. You can program the parameter control knob to offset (+/-) above and
below a center value or just to send positive (+) values, depending on what you wish to
accomplish. When setting the Play mode Control parameters you can specify the offset
type and the range over which the knob has affect. [PLAY]: [CONTROL]: [PgmCtrl 2]
page.
As with the Function keys above, the [ASSIGNABLE] key can be set to select Knob Control
at any time, from any screen—even during a sample record session. If you select “Fkey
ON/OFF” as the Assignable option (Utility – System) and then activate the [ASSIGNABLE]
button while viewing the [Knob Ctrl] screen, you have a situation where both the Knobs
and Function Keys are activated as Panel Play controllers, simultaneously.