


Resampling and Time Compression / Expansion
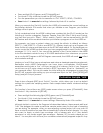
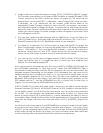
The Resample routine is found under [EDIT]: [TRIM/LOOP]: [COMMAND key]: RESMPL. This
page allows you to (1) adjust the length (longer or shorter) of the playback time (Time
Stretch) without affecting the sample’s pitch or (2) to adjust the Pitch directly (Pitch
Conversion) without effecting the length. A time Stretch of 100% is no change. 50% plays
in half the time, 200% takes twice as long to play, 300% takes 3 times as long, 400% 4 times
as long, etc. Beyond a certain point it becomes an unusal effect- but that’s just fine. You
can weight the results toward rhythmic accuracy or sound quality. You can time stretch
a specific number of samples or set the value via the convenient % scale. You can
calculate any exact time or tempo you need. An interesting thing to note is that you can
audition how the Time Compression/Expansion or Pitch Conversion will sound before you
execute it. This is accomplished by simply pushing and holding the (TmStretch) knob. You
can, of course, change the Pitch without changing the tempo.
The RESAMPLE routine is found under the COMMAND key when pressed from [EDIT]
mode: [TRIM/LOOP] function. Executing this routine actually re-writes the sample data.
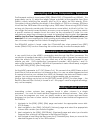
Resampling Audio through the Effects
A very useful trick on the A3000 is re-sampling data through the Effect processors. This
connection is handled internally by the A3000 operating system. Prepare the sample and
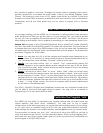
apply the effects PLAY mode. You can utilize any or all the effect processors in any
manner you wish. 1/2/3/ signifies the 3 processors in parallel. 1Æ2/3 signifies 1 and 2 in
series while 3 remains in parallel. 1Æ2Æ3 is all 3 processors in series. When ready, navigate
to the [RECORD]: [SETUP]: [Rec Data] page.
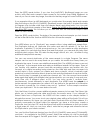
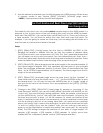
Set the INPUT parameter to ST OUT (Stereo Out). This connects the A3000 Stereo output
(post Effects) to the record input via internal routing. You can use either triggered record
or manual record as your method; the A3000 will resample the data and create a new
sample. You can even resample at a lower or higher sample rate, as necessary.
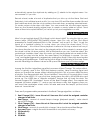
(Notice that nothing can be set on the [RECORD] mode: [EFFECT] function page – the
RecEfSw (Record Effect Switch) is forced to off – this page is used for original recordings,
only, not re-samples).
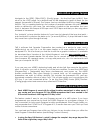
Building Custom Volumes
Assembling custom volumes from programs found in other volumes is a simple
procedure. You must first load individual Programs from different volumes. Then, after
you have the programs you want, you simply create a new Volume and load those
programs into your new custom volume. The procedure to load individual Programs into
the A3000 is:
1. Navigate to the [DISK]: [DISK]: [Disk] page and select the appropriate source disk-
SCSI or floppy.
2. Next navigate to the [DISK]: [VOLUME]: [Volume] page and select the appropriate
Volume that contains your favorite Program.
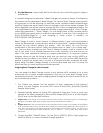
3. Next navigate to the [DISK]: [PROGRAM]: [PgmLoad] page and select your favorite
Program from a listing of all Programs in the selected Volume.
4. Now instead of executing the load, press the [COMMAND] key. Here you re-route the
selected Program to any of the 128 locations.