3-4
P/N: 4PFX020-020
©2006 Paxton Automotive
All Rights Reserved, Intl. Copr. Secured
24APR06 v1.1 MusGT(4PFX..020 v1.1)
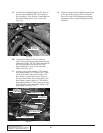
M. Install the 3/8" x 2 1/2" countersunk bolt
through the lower most hole in the support
plate and thread it into the mounting plate.
Do not tighten this bolt. (See Appendix
1016611.)
Fig. 3-i
Fig. 3-h
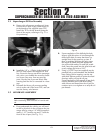
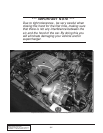
*** NOTE ***
You will have to route the accessory drive belt before
installing the supercharger belt tensioning plate. See
Appendix #1016710.
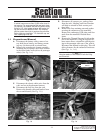
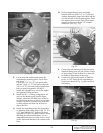
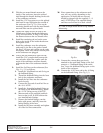
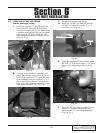
K. Locate the supercharger belt tensioning
plate. Assemble the idler pulley and super-
charger belt tensioning assembly. (See Fig.
3-h.)
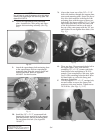
L. Attach the supercharger belt tensioning plate
to the supercharger and rear supercharger
mounting plate using the spacers, bolts and
washers provided. Refer to Appendix
#1016611 for their location.
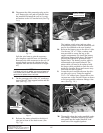
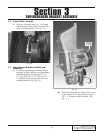
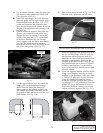
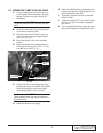
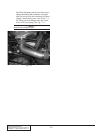
N. Above that, insert two of the 3/8" x 3 1/4"
bolts with washers through the support plate,
spacer and mounting plate. Secure the acces-
sory drive belt tensioner to the back of the
mounting plate with the upper of these two
bolts holes, the lower with the 3/8" x 1" bolt
and washer provided. Secure the other side
of the belt tensioner bracket to the stud at
the top of the water pump with the 3/8" nut
and washer. Do not tighten these bolts. (See
Fig. 3-j)
Fig. 3-j
O. There are three (3) countersunk holes left in
the support plate. They each take the
remaining 3/8" x 3 1/4" counter sunk bolts.
Install these bolts and tighten to 28-30 ft
pounds. Upon completion of this step, tight-
en all of the remaining bolts that have been
left hand tight, as well as the Smog and
alternator assemblies.
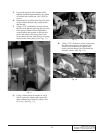
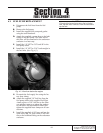
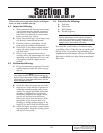
P Use the supplied 1/2" x 3 1/2" carriage bolt,
nut and washer to secure the factory belt
tensioner to the new bracket. Tighten nut to
28-30 ft lbs.. (See Figs. 3-j, 3-k.)
Fig. 3-k