


YP3040 Installation Guide Page 7
ENGLISH
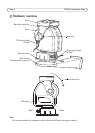
Install the hardware
Install the wall bracket
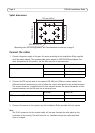
1. Prepare the wall for installation of the wall bracket (recommended accessory), use the supplied
drill template to position the holes. Make sure to use drill bits, screws, and plugs that are
appropriate for the material.
2. Pull the cables through the wall bracket, see illustration on page 9.
3. Attach the wall bracket to the wall with the round platform facing upwards.
Install the Pan-Tilt Motor
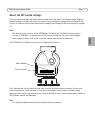
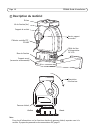
1. Place the pan-tilt motor on the wall bracket, see illustration on page 6 for alignment and direc-
tion of tilt.
2. Secure the pan-tilt motor by tightening the supplied bolts.
Install the camera in the housing
Install the camera in the housing according to the instructions in the Installation Guide provided
with the housing. Make sure to allow for the PTZ control cable to pass through the housing to the
camera, see Connect the cables, on page 8. For more information, see the Installation Guides
provided with the housing and the camera.
Install the housing on the Pan-Tilt Motor
1. Detach the splint by removing the mounting screws on the brace, using the supplied allen key.
See illustration on page 6.
2. Use the supplied 2 countersunk screws to mount the housing on the splint.
3. Attach the splint with the housing to the brace.
!
IMPORTANT! - To avoid collision, make sure there is enough clearance around the
pan-tilt motor and camera/camera housing (minimum clearance to the ceiling is 60 cm
or 24 in. from the top edge of the wall bracket).
!
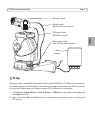
IMPORTANT! - Make sure to leave enough slack to allow for the cables to twist and
bend along with the unit.