


U.S. ELECTRICAL MOTORS
INSTALLATION AND MAINTENANCE
IX. DISASSEMBLY
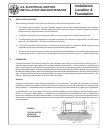
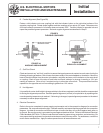
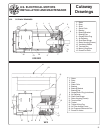
See Figure 4 for Bearing Housing Cross Section.
A. Disconnect power. Refer to section on Safety, page i.
B. Remove grills and/or weather protected tophat as required.
C. Remove bearing cap screws.
D. Remove bearing temperature detector probes from brackets as applicable.
E. Remove bracket to stator bolts and remove brackets.
F. If bearings are to be replaced, remove bearings from rotor shaft with a bearing puller. Pull on inner bearing race
to remove bearings without damage.
G. To remove filters on weather protected units for inspection and cleaning, remove end cover and rotate latch.
Slide filter out of tophat assembly.
Hazardous Location Motors: (Underwriter's Laboratories Requirements)
These motors are built to specifications approved by Underwriter's Laboratories. Assembly and inspection is
made by authorized personnel at our factory before the Underwriter's Label is affixed. The Label is void if the
unit is disassembled at other than U.S. Electrical Motors plant of manufacture or a U. S. Electrical Motors
authorized and U.L. approved service shop, unless specific approval for such action is obtained from
Underwriter's Laboratories.
X. REASSEMBLY
A. Clean all machined and mating surfaces on bearing caps, bracket fits, etc.
B. Remove old grease from grease cavities and bearings.
C. Carefully inspect bearings for nicks, dents or any unusual wear patterns. Damaged bearings must be replaced.
D. If motor is supplied with insulated bearing shaft journals, inspect for damage and repair as necesary before
reassembly.
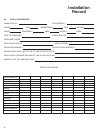
Disassembly
& Reassembly
11
FIGURE 4
1. BEARING BRACKET
2. BEARING CAP
3. BEARING
4. GREASE FILL FITTING
5. GREASE DRAIN PLUG
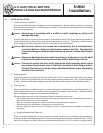
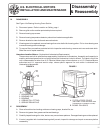
FIGURE 5
A. FILTER ACCESS COVER
(SEE TABLE 5 FOR REQUIRED END
CLEARANCE TO REMOVE FILTER)
B. DOWEL PIN HOLES
B
A