


4-1
Chapter 4
Installation
Introduction
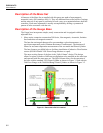
The gauge should be installed in a room where the temperature is maintained between
18 ºC to 28 ºC. The actual temperature is not as important as the stability in temperature.
There should not be excessive personnel traffic and air drafts. Airborne dust is
undesirable, but clean-room standards are not required.
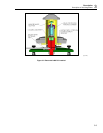
1. Remove the gauge from its shipping box and locate it on a clean, level, sturdy work
surface. The surface should be able to support fifty pounds of weight without
deflecting and be secure enough to be free from vibration.
2. Level the base by turning the three leveling screws until the bubble in the level vial is
centered.
3. Connect the pressure housing fitting to the pressurizing source and to the test
instrument with 1/4" O.D. stainless steel tubing which has a working pressure rating
of 3,000 psi or more. The tube requires a 37 degree flare for AN4 tube nut. Final
tightening of the tube nuts should be delayed until after the base has been leveled.
The pressure housing may be reoriented on the base if it is desired, but when the
thermometer is on the left side, the numerals are inverted.
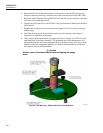
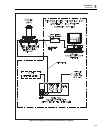
4. The pressurizing source should appropriate regulator, valves, and system volume
adjuster to control the supply gas pressure from 0 to 3000 psi. Refer to Figure 4-2 for
the recommended plumbing schematic. The RUSKA Series 3990 Manual Pressure
Control Packs is recommended for this application.
5. Loosen the tube nut to the pressure housing fitting and level the instrument base.
6. Lock the level screws with the nuts located beneath the base plate. A 7/16" open-end
wrench is required.
7. Tighten the pressure fitting nut being careful that the residual stress in the connecting
tube is small and that the instrument base is not forced out of level.
If the RUSKA 2456 Piston Gauge Monitor is being used with the instrument. Attach the
RUSKA 2456 to the instrument base as follows:
1. Install the PRT holder fitting in the thermowell on the base.
2. Install the PRT (Platinum Resistance Thermometer) in the fitting using a dab of Heat
sink compound on the tip of the PRT. (Heat sink compound is provided with the kit
which adapts the RUSKA 2470 base to the RUSKA 2456). The heat sink compound
will reduce the response time of the PRT.
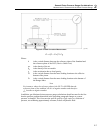
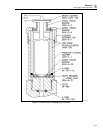
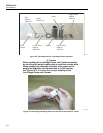
3. Mount the (2) FPI spacer blocks (P/N 2455-2470-001) to the top of the base plate as
shown in Figure 4-1 using the screw provided.