


34
3.3 Remote Controller Setting
A remote controller can be set exclusively for use with a specific display unit, in the case of
multiple NavNet display units. Set the remote controller ID mode desired on the menu and
attach appropriate label (supplied with accessories) to the remote controller and display
unit.
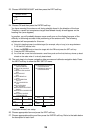
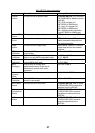
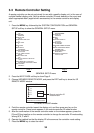
1. Press the MENU key followed by the SYSTEM CONFIGURATION and GENERAL
SETUP soft key to show the GENERAL SETUP menu.
Page 2
Page 1
KEY BEEP
ON
LANGUAGE
ENGLISH
RANGE UNIT
nm, kt
TEMPERATURE UNIT
°F
DEPTH UNIT
ft
WIND UNIT
ft
WIND DATA
APPARENT
SPEED AVERAGING
60 seconds
LOCAL TIME OFFSET
9H 0m
RESET TRIP LOG
NO
TIMEOUT DISPLAY SETTING
15 sec
SAVE MOB KEY FUNCTION
SAVE SHIP POSITION & MOB
WALLPAPER
DEFAULT
LAT/LON DISPLAY
DD˚MM.MMMM'
TD DISPLAY
LORAN C
SPEED
SOG
POSITION DISPLAY
LAT/LON
TIME DISPLAY
24 HOURS
INFRARED REMOTE MODE
A
RANGE & BEARING MODE
RHUMB LINE
BEARING READOUT
MAGNETIC
MAGNETIC VARIATION
AUTO 07.0°E
GENERAL SETUP menu
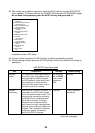
2. Press the NEXT PAGE soft key to show Page 2.
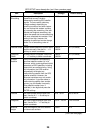
3. Choose INFRARED REMOTE MODE, and press the EDIT soft key to show the I/R
REMOTE MODE window.
I/R REMOTE MODE
A
B
C
D
MODE
A
PRESS '0' AND '2' KEY
TOGETHER TO CHANGE MODE.
Remote controller ID
mode window
I/R REMOTE MODE window
4. Point the remote controller toward the display unit, and then press any key on the
remote controller. Preset mode appears in the remote controller ID mode window.
5. After the confirmation of the remote controller mode on the window appears, press the
[0] and [2] key together on the remote controller to change the controller ID mode setting
among A, B, C and D.
6. Operate the trackball so that the display ID is the same as the controller mode setting.
7. Press the MENU key to close the menu.