


Fishnder 160C Owner’s Manual
InstAllIng the fIshfInder 160c > trAnsducer InstAllAtIon
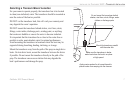
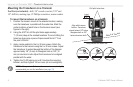
Mounting the Transducer on a Transom
Tool List (not included)—drill, 3/8" wrench or socket, 5/32" and
1/8" drill bits, masking tape, #2 Phillips screwdriver, marine sealant.
To mount the transducer on a transom:
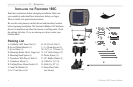
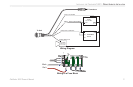
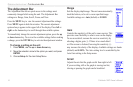
1. Position the transom mount at the selected location, making
sure the transducer is parallel with the water line. Mark the
center locations of each hole on the transom mount (see
gurestotheright).
2. Usingthe5/32"bit,drillthepilotholesapproximately
1" (25 mm) deep at the marked locations. To avoid drilling the
holes too deep wrap a piece of tape around the bit 1" from
the point of the bit.
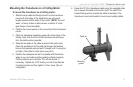
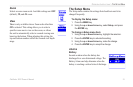
3. Applymarinesealanttothe5x30mmscrews.Attachthe
transducertothetransomusingthe5x30mmscrews.Adjust
thetransducertoextendbeyondthebottomofthetransom
approximately1/8"(3mm)onberglasshullsor3/8"(10
mm) on aluminum hulls. Adjust the transducer to be aligned
parallel with the water.
4. Tightenthe10-32lockingnutuntilittouchesthemounting
bracket, and then tighten 1/4 turn more (do not overtighten).
NOTE: After you install the transducer on a transom, it is highly
recommended you test the installation (see page 10)
OK
Level
Drill pilot holes here.
Vertical
Bottom of Transom
Align with transom
bottom. Transducer
should extend 1/" below
berglass hulls or /"
below aluminum hulls.
Keep parallel with water line.