


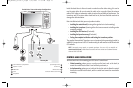
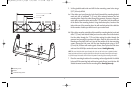
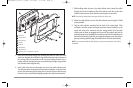


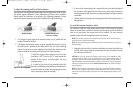

5. Insert the control head through the mounting hole from the front side of the
dash. From the back side of the dash, align the two threaded rods on the rear of
the housing with the two holes on the in-dash mounting bracket. Place a
washer onto each threaded rod, then secure bracket by placing a wing nut onto
each threaded rod and tighten fully.
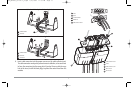
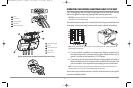
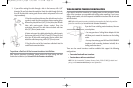
6. Insert cable connectors into the proper recesses on the cable collector insert.
The cable connectors are keyed to prevent reverse installation, so be careful not
to force the connectors into the wrong slots. If you don’t have a cable for every
hole in the insert, install the blank plugs to protect the unit from the weather.
7. While holding cables in place in the cable collector insert, thread the cables
through the slot in the bottom of the cable collector cover, line up the cable
collector insert and cover, then slide the cover into place on the insert.
NOTE: The tab on the cable collector insert goes into the slot on the cover.
8. Attach the cable collector insert to the cable collector cover using the 2 Phillip
screws provided.
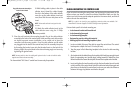
9. Plug the cable collector assembly into the back of the control head. Cable
connectors and cable sockets are keyed to prevent reverse installation, so be
careful not to force the connectors into the wrong sockets. Once the cable
collector and all cables are plugged into the back of the control head, lock the
assembly into place by threading the knurled screw into the threaded insert on
the back of the housing. (Cable ties are provided to help you secure the cables in
place by threading them through the available holes on the in-dash bracket).
NOTE: It is very important that the cable collector is used and secured in place in the In-Dash
installation.
Foam Pads
1
In-Dash Bracket
2
Cut Away Dash
3
Washers
4
Wing Nut
5
Threaded Rod
6
Threaded Insert
7
Expansion ports - use for future accessories
8
1
3
2
4
5
6
7
8
9
98x_Manual_531376-1_A.qxd 2/23/2005 11:39 AM Page 15