


14
Prepare the Server
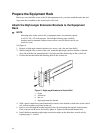
Before you can install the server in the 19-inch equipment rack, you must install a bezel, handles, and
the small bars of the slide assemblies onto the sides of the server.
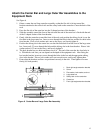
Attaching the Bezel Frame and Door
To be installed in a rack, the server needs a bezel frame with rectangular cutouts where the chassis
handles fit.
1. Attach the bezel frame by inserting the tabs at the corner of the frame into their corresponding
rectangular slots on the chassis.
2. Attach the bezel door: with the door all the way open (down, as the server lay as it would when
inserted in a rack), align the tabs on the door with their corresponding hinge loops on the chassis;
slide the door to the right to engage the tabs in the loops.
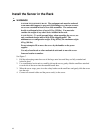
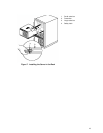
Attach the Chassis Handles
Before you can attach the chassis handles, the server must be on its side, in the horizontal position in
which you will slide it into the rack. If the server is not already in the proper position, you must
move it. See step one, below.
WARNING
AVOID INJURY: To avoid personal injury when unpacking the server, use
only a mechanical assist unit to lift it off the shipping pallet. The
minimum server configuration weighs 38 kg (85 lbs); the maximum weighs
45 kg (100 lbs).
Do not attempt to lift or move the server by the handles on the power
supplies.
Use only a hand-truck or other mechanical assist unit to move the server
from one location to another.
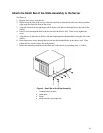
1. If the server is not already in the proper position, then face the front of the server and, with the
help of a mechanical assist unit, carefully tip it onto its side. The long front edges (19 inches)
should now be horizontal; the short front edges (12.25 inches) should now be vertical, with the
front-panel LEDs at the top left and the hard drive bays at the bottom right of the front panel.
The bezel frame has rectangular cutouts on its edges where the chassis handles fit; you should be
able to see two threaded holes in that cut-out space where the handles attach to the chassis.
2. Orient each handle so the two screw holes on the long edge of each handle align with the threaded
holes in the chassis. Because the bezel frame’s cutouts act as guides, the handles can be installed
in only one way.
3. Use four screws from the kit to attach the handles to the chassis.