


17
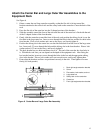
Attach the Center Bar and Large Outer Bar Assemblies to the
Equipment Rack
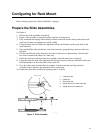
See Figure 6.
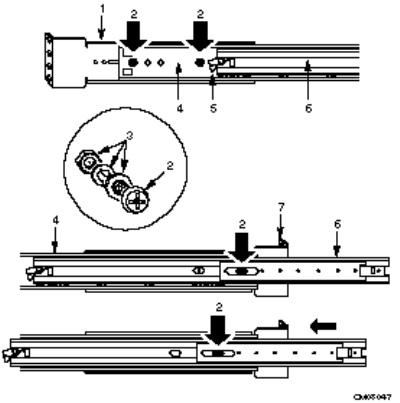
1. Orient a center bar and large outer bar assembly so that the flat side is facing toward the
brackets attached to the vertical rails and the safety latch on the center bar is near the back of the
rack.
2. Press the flat side of the outer bar into the U-shaped sections of the brackets.
3. Slide the assembly toward the front of the rack until the end of the outer bar is flush with the end
of the U-shaped section of the front bracket.
4. Gently slide the center bar toward the front of the rack, and position the oblong slot in it over the
first hole in the large outer bar. Insert a screw through the hole in the bar and the first hole in the
front bracket. Place a lock washer and a nut on the screw, and loosely tighten it.
5. Position the oblong slot in the center bar over the third hole back from the front of the large outer
bar. Insert an 8-32 screw through the hole and the oblong slot in the front bracket. Place a lock
washer and an 8-32 nut on the screw, and loosely tighten it.
6. The back bracket has two holes and three slots in it. This end of the outer bar has four holes in
it. Which holes and slots you use depend on the depth of the equipment rack. After fitting the
bar into the bracket, insert two screws through the holes in the bar and the appropriate oblong
slots in the bracket. Place a lock washer and a nut on each screw, and loosely tighten them.
7. Ensure that the brackets and bars are positioned correctly in the rack. Then tighten all screws
firmly (6.0 inch-pounds).
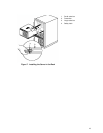
1 Back right-angle extension bracket
2 Screw
3 Flat washer, lock washer, and nut
4 Large outer bar
5 Safety latch on the center bar
6 Center bar
7 Front right-angle extension bracket
Figure 6. Center Bar and Large Outer Bar Assembly