


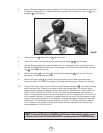
corrosion. Corrosion or minor scratches can be polished out using a fine-grit rubberized
polishing stick or a clean new pencil eraser. Do not apply heavy pressure when rotating the
polishing stick. Stop polishing immediately after the corrosion or scratch disappears. An orifice
will not be accepted for warranty replacement simply because it is dirty or corroded. The
technician must clean the orifice sealing surface at every service interval.
19. Blow all dust and debris out of the orifice housing with clean compressed air.
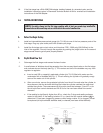
5.3 ASSEMBLY OF SECOND STAGE
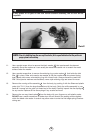
1. Re-install the cleaned and lubricated O-ring onto the adjustable orifice . Install the
adjustable orifice back into the orifice housing. Push it in with your finger as far as it will go.
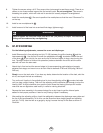
2. Install the exhaust valve into the case by inserting the nipple into the small hole from the
outside of the case. Reach inside the case and pull the nipple firmly with the fingers until you
hear or feel it “click” into place. Inspect the exhaust valve to see that it is properly seated.
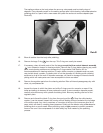
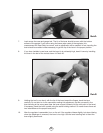
3. Install the lever support assembly into the proper hole in the case from the inside. Note
that the Blizzard and Oasis style lever assambly will be installed with the heat transfer fins
still attached. The fins must be installed into the mouthpiece on the correct side of the
locating tabs in the top and bottom of the mouthpiece tube. When looking through the case
mouthpiece tube from the outside (mouthpiece end) the fins must be on the right side of the
locating tabs. Screw the orifice housing onto the threads of the lever support . Use a 6"
or 8" adjustable wrench to tighten the orifice housing onto the lever support assembly snugly
70 in. lbs. (8 joules).
THE FOLLOWING STEPS (4 - 10) ARE INCLUDED HERE FOR CONTINUITY. THEY MUST BE
PERFORMED AFTER THE REGULATOR SECOND STAGE IS ADJUSTED (see Section 5.4, Set-Up of
Second Stage).
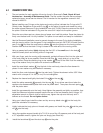
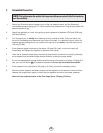
4. Install the diaphragm into the case so that it sits evenly on the ledge.
5. Install the retaining ring into the diaphragm recess.
6. Install the cover onto the case by sliding the retaining loop over the orifice housing, and
then working the cover over the case until it sits properly in its groove in the cover.
7. Install the exhaust tee onto the case using the two screws .
15
NOTE
: Prior to this point, you should have cleaned and inspected all parts, following proper servicing
procedures. Do not continue until this has been done.
NOTE
: Depending on the owner’s needs, either the Blizzard & Oasis style extended tee for maximum
bubble dispersion, or the Magnum/Brut style shorter tee for minimum weight and drag, can be installed on
any of the three models.
NOTE
: Do not allow lubrication (grease on fingers, silicone overspray, etc.) to get on the case , the
diaphragm , the retaining ring , or the exhaust valve . This may cause these parts to slip or
deteriorate.
14
19
20
7
7
8
9
4
3
2
15
16
19
14
3
4
23
22