


GX1256S Page 21
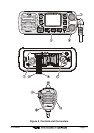
6 BASIC OPERATION
6.1 RECEPTION
1. After the transceiver has been installed, ensure that the power supply
and antenna are properly connected.
2. Press and hold the VOL/PWR knob until the radio turns on.
3. Turn the SQL knob fully counterclockwise. This state is known as “squelch
off”.
4. Turn up the VOL/PWR knob until noise or audio from the speaker is at a
comfortable level.
5. Turn the SQL knob clockwise until the random noise disappears. This
state is known as the “squelch threshold.”
6. Press the
[
UP
]
or
[
DOWN
]
key to select the desired channel. Refer to the
channel chart on page 60 for available channels.
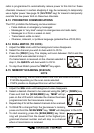
7. When a message is received, adjust the volume to the desired listening
level. The “BUSY” indicator in the LCD is displayed indicating that the
channel is being used.
6.2 TRANSMISSION
1. Perform steps 1 through 6 of RECEPTION.
2. Before transmitting, monitor the channel to ensure it is clear. THIS IS AN
FCC REQUIREMENT!
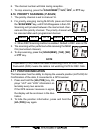
3. Press the PTT (push-to-talk) switch. The TX indicator on the LCD is dis-
played.
4. Speak slowly and clearly into the microphone.
5. When the transmission is finished, release the PTT switch.
NOTE
This is a noise-canceling microphone. The oval slot on the bottom of
microphone should be positioned within 1 inch (2.5 cm) from the
mouth for optimum performance.
6.3 TRANSMIT TIME - OUT TIMER
(
TOT
)
When the PTT switch on the microphone is held down, transmit time is limited
to 5 minutes. This limits unintentional transmissions due to a stuck micro-
phone. About 10 seconds before automatic transmitter shutdown, a warning
beep will be heard from the speaker(s). The transceiver will automatically go
to receive mode, even if the PTT switch is continually held down. Before trans-
mitting again, the PTT switch must first be released and then pressed again.