


8 XPower Inverter 1000 Owner’s Guide
Inverter Installation
Install the Inverter
Review and follow the safety guidelines in “Important Safety Instructions”
on page iv before proceeding with installation.
Overview of Installation Steps
• Mount the inverter.
• Connect the chassis ground.
• Connect the DC cables.
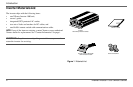
Mount the Inverter
1. Make sure the inverter’s ON/OFF switch is in the Off position.
2. Select an appropriate mounting location and orientation. The inverter
must be oriented in one of the following ways:
• Horizontally on a vertical surface. (The ventilation opening on
the DC end must not point up or down.)
• On or under a horizontal surface.
3. Hold the inverter against the mounting surface, mark the positions of
the mounting screws, and then remove the inverter.
4. Pilot drill the four mounting holes.
5. Fasten the inverter to the mounting surface using corrosion-resistant
fasteners sized #10 or larger.
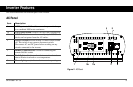
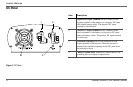
Connect the Chassis Ground
1. Make sure the inverter’s ON/OFF switch is in the Off position.
2. Locate the screw terminal labelled CHASSIS GND on the DC panel
and remove the chassis ground screw and star washer.
3. Attach the ground cable’s ring connector to the screw terminal on the
inverter and secure with the star washer and chassis ground screw.
4. Attach the other end of the ground cable to the vehicle chassis via a
grounding point on the vehicle.
IMPORTANT:
Do not mount the inverter under the engine hood of a
vehicle.
ELECTRICAL SHOCK HAZARD
Never operate the inverter without properly connecting the chassis
ground to the vehicle chassis.
Failure to follow these instructions will result in death or serious
injury.