


9
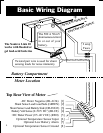
Basic installation of the Link 10 on a 12 or 24 volt system involves only
five wires. Because the Link 10 will work on systems up to 500 volts,
special high voltage installation techniques are discussed beginning on page
44. You need to read this section if you're working on an electric vehicle or
system where more than 50 volts is encountered. If your installation is on
a 12 or 24 volt system, let's get to work!
Installation Planning
First, gather all the tools you'll need for installation. We recommend:
* A 2" or 2 1/16" (52 mm) hole saw to make the panel cutout.
* A 3/8" drill with bits to run power and shunt wiring.
* An adjustable 9/16" wrench for shunt bolt connections.
* Wire stripper/crimper and a small flat blade screwdriver.
Make sure you have all the parts you'll need to complete the job:
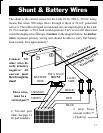
* A 500 A–50 mV shunt (included)
* #18 or #16 twisted pair shunt wire long enough to reach
from the battery to the meter location. Ask your dealer for
Xantrex Technology PN 84-2014-00 - 25' 4 twisted pair cable
or PN 84-2015-00 - 50' 4 twisted pair cable (not included).
* 2 in-line fuse holders with 2-amp fuses.
CAUTION: DO NOT INSTALL FUSES UNTIL YOU
COMPLETE INSTRUCTIONS ON PAGES 10–15.
* A short heavy-duty battery cable to run from one shunt bolt
to the battery. Cable is available at auto and marine shops.
* Assorted small-gauge crimp type terminals for connecting
the power, shunt, fuses, and voltage sense leads.
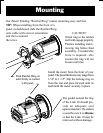
Installation