


CN 2110
Omega
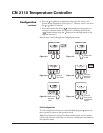
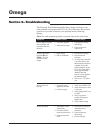
Factory Calibration
Recovery
This procedure allows you to return the controller to its factory calibra-
tion settings in the event it is severely out of calibration due to poor
technique or unauthorized calibration.
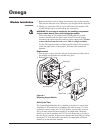
1. Disconnect load power.
2. Cycle the sensor selection switch twice from its original position (TC
or RTD) to the opposite position (RTD or TC) and back to its original
position. This brings back the factory calibration and deletes the
manual calibration settings.
20
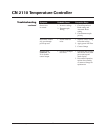
Section 7–Calibration
Calibration Notes:
When calibrating the CN 2110
1. You must have a sensor simulator to calibrate the CN 2110 controller.
Substitute a precision sensor simulator (Thermocouple simulator or
resistance simulator box) for sensor inputs.
2. Disconnect load power to prevent damage to the process or load.
3. Calibrate RTD inputs using copper (Cu) wire. Calibrate thermo-
couple inputs using thermocouple extension wire of the same type as
the thermocouple you are calibrating.
4. Allow the controller to warm up with the appropriate sensor simula-
tor connected for at least one hour prior to calibration.
5
. To access the calibration menu, you need level C (736) security.
Sensor Calibration:
1. Set the CN 2110 selection switch to RTD or TC. If TC is selected,
then set the selection switch to J or K.
2. Connect the sensor simulator to the sensor input terminals.
3. Set the simulator to the low value of the sensor selected J TC
(-100°F), K TC (-100°F), RTD (-200°F or 48.46Ω).
4. Go to the CALS parameter on the CN 2110. The display will toggle
between CALS and inLo.
5. Wait 30 seconds for the electronics to fully stabilize. Press
. Dashes
will appear in the display while the controller calibrates the low end
of span.
6. When the controller prompts inHi in the display, adjust the sensor
simulator to the high end of the selected sensor span.
J TC (1400°F), K TC (2400°F), RTD (1000°F or 293.49Ω).
7. Wait 30 seconds for the electronics to fully stabilize. Press
. Dashes
will appear in the display while the controller calibrates the high end
of span. When finished, the controller will display donE.
8. Calibration is complete.
Calibration
continued