


3-19
2. Press the NEXT PAGE soft key to show Page 2.
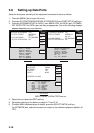
3. Select INFRARED REMOTE MODE, and press the EDIT soft key.
The SELECT I/R REMOTE window appears.
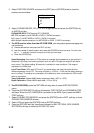
4. Point the remote controller toward the display unit, and press any key on the remote
controller. Preset mode appears in the remote controller ID mode window.
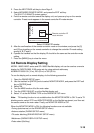
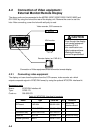
SELECT I/R REMOTE
A
B
C
D
MODE
A
PRESS '0' AND '2' KEY
TOGETHER TO CHANGE MODE.
Remote controller ID
mode window
Select I/R REMOTE window
5. After the confirmation of the remote controller mode on the window, and press the [0]
and [2] key together on the remote controller to change the controller ID mode setting
among A, B, C and D.
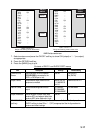
6. Operate the trackball so that the display ID should be the same as the controller mode
setting.
7. Press the [MENU] key to close the menu.
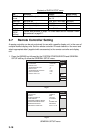
3.8 Remote Display Setting
MODEL 1800C/1900C series and GD-1900C NavNet display unit can be used as a remote
display for FAR/FR-2805, 2105 series etc. by using optional cable assy
MJ-B24LPF0008-100 (10 m), 200 (20 m) or 300 (30 m).
To use the display unit as remote display, do the following procedure.
1. Open the RADAR SETUP menu.
2. Use the trackball or [ENTER] knob to select MONITOR MODE, and press the EDIT soft
key or [ENTER] knob.
3. Select ON.
4. Turn the MBS function off at the main radar.
5. Turn the VIDEO ADJUST on at the NavNet display unit.
6. Select “H” at the ANTENNA TYPE on the RADAR SETUP menu.
Note: TX blanking function is not available when the MONITOR MODE is ON. To set a TX
blanking sector, select OFF from MONITOR MODE on the NavNet equipment, and then set
the sector same as the main radar. Finally, set MONITOR MODE to ON.
When the MONITOR MODE is ON, the following functions are not available.
•Tuning (auto/manual, on the RADAR SETUP menu)
•Antenna rotation (RADAR SETUP menu)
•TX sector blanking (RADAR DISPLAY SETUP menu)
•Watchman (RADAR DISPLAY SETUP menu)
•Pulse select (Soft key)