


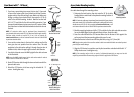

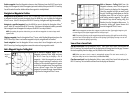

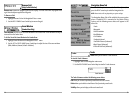

Add or Remove a Trolling Grid: From the
Waypoints submenu, select Grid and press the
RIGHT Cursor key to display a list of waypoints.
Select the waypoint to which you want to add
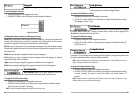
the grid. The trolling grid will appear on all of the
navigation views, and can be used as a guide
when trolling around a waypoint. The grid can
be rotated to any desired heading using Grid
Rotation from the Navigation Main menu. To
remove the trolling grid, choose Remove Grid
from the Navigation X-Press™ menu.
NOTE: Only one waypoint can have either a target or a grid at one time. If you apply a target or a grid
to a new waypoint, the original waypoint will lose its target or grid.
NOTE: The spacing of the rings on the waypoint target and the spacing of the grid lines on the trolling
grid is the same as the length of the scale bar on the left edge of the display. Zooming in or out will
decrease or increase the spacing, respectively.
Save or Clear a Current Track
Save the current track: From the Navigation X-Press
TM
menu, select Save Current Track and press the
RIGHT Cursor key. The track will remain on the display, but will change from black to gray. To remove
the track completely from the display, see Edit, Delete or Hide Saved Tracks.
NOTE: When you save a track, a name is automatically assigned. The track name consists of a
date/time stamp, but can be re-named later (see Edit a Saved Track).
Clear the current track: From the Navigation X-Press
TM
menu, select Clear Current Track and press the
RIGHT Cursor key. The track will be removed from the display and discarded.
Track View with Grid
Waypoint
Trolling
Grid
Track
Scale
13
Delete a waypoint: From the Waypoints submenu, select Delete and press the RIGHT Cursor key to
display a list of waypoints. Select the waypoint you want to delete, then press the RIGHT Cursor key.
You will be asked to confirm deletion before the waypoint is actually deleted.
Navigate to a Waypoint or Position
Navigate to the cursor position: From the Track or Combo view, use the Cursor key to select a position
or waypoint to which you want to navigate. Press the MENU key once to display the Navigation
X-Press
TM
menu. Select Go To and press the RIGHT Cursor key. Navigation will begin immediately.
Navigate to a specified waypoint: Press the MENU key once to display the Navigation X-Press
TM
menu. Select Go To and press the RIGHT Cursor key. Then choose the waypoint to which you would
like to navigate from the waypoint list and press the RIGHT Cursor key to select it.
NOTE: By repeating the previous instructions, you can add more waypoints to create a longer multi-
segment route.
Skipping a waypoint: From the Navigation X-Press
TM
menu, select Skip Next Waypoint and press the
RIGHT Cursor key. If there is not another waypoint to skip to, navigation will be cancelled.
Cancel navigation: From the Navigation X-Press
TM
menu, select Cancel Navigation and press the
RIGHT Cursor key. Canceling navigation removes the route and any waypoints created.
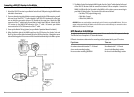
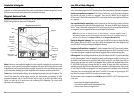
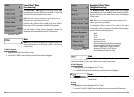
Add a Waypoint Target or Trolling Grid
Add or Remove a Waypoint Target: From the
Waypoints submenu, select Target and press
the RIGHT Cursor key to display a list of
waypoints. Select the waypoint you want to
target. A target consisting of concentric circles
centered on the selected waypoint will appear
on all of the navigation views; the target shows
various distance ranges from the targeted
waypoint. To remove the target, choose Remove
Target from the Navigation X-Press™ menu.
Track View with Target
Waypoint
Target
Track
Scale
12