


19
4 OPERATING BASICS
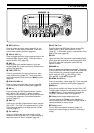
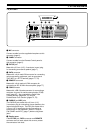
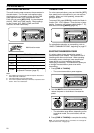
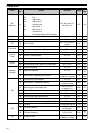
SELECTING A BAND
Press [ ]/ [ ] to select your desired band.
• Holding down either key changes the bands
continuously.
NAR
1 REC 2 REC
5 RF.G
0 OFF
8
3 REC
9
4
7
TX MONI
6
DELAY
HF/50MHz ALL MODE TRANSCEIVER TS-480
CLR
STEP SG.SEL
CW.T
F.LOCK
M/V
SPLIT
M VFO
M.IN
TF-SET
MULTI
IF
SHIFT
AF SQL
PF
AT
CH1 CH2 CH3
PWR
MIC KEY
VOX
PROC
AGC
ENT
A / B
A=B
MODE
MHz
QMI
QMR
MENU
MTR
NB/T
ANT 1/2
FINE SCAN
DNL
BC
NR FIL
RIT
XIT
CL
ATT/PRE
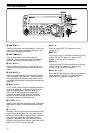
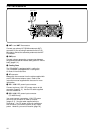
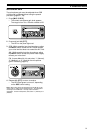
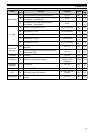
SELECTING A MODE
Press [MODE] to cycle through the 4 mode pairs:
USB/ LSB, CW/ CWR, FSK/ FSR, and AM/ FM. Each
time you press [MODE], the mode display cycles
USB or LSB, CW or CWR, FSK or FSR, FM or AM.
To select the other mode on each pair, press [MODE]
(1 s). For example, to select “LSB” while “USB” is
visible, press [MODE] (1 s). “USB” changes to
“LSB”. Press [MODE] (1 s) again to go back to
“LSB” from “USB”. The following illustration
describes how to access each mode with the [MODE]
key.
NAR
1 REC 2 REC
5 RF.G
0 OFF
8
3 REC
9
4
7
TX MONI
6
DELAY
HF/50MHz ALL MODE TRANSCEIVER TS-480
CLR
STEP SG.SEL
CW.T
F.LOCK
M/V
SPLIT
MVFO
M.IN
TF-SET
MULTI
IF
SHIFT
AF SQL
PF
AT
CH1 CH2 CH3
PWR
MIC KEY
VOX
PROC
AGC
ENT
A / B
A=B
MODE
MHz
QMI
QMR
MENU
MTR
NB/T
ANT 1/2
FINE SCAN
DNL
BC
NR FIL
RIT
XIT
CL
ATT/PRE
MODE
MODE
MODE
MODE
MODE
(1 s)
MODE
(1 s)
MODE
(1 s)
MODE
(1 s)
Access Menu No. 02 then press [ ] to select “on” to
turn the Auto Mode selection ON. When it is ON,
“AUTO” appears. As a default setting, if you change
the frequency above or below 9.5 MHz, the
transceiver automatically switches modes; LSB for
frequencies under 9.5 MHz and USB for frequencies
equal to or over 9.5 MHz. You can further add the
frequency table data to change the mode
automatically {page 61}.
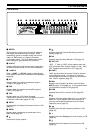
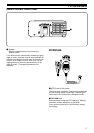
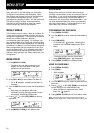
ADJUSTING SQUELCH
The purpose of the Squelch is to mute the speaker
when no signals are present. With the squelch level
correctly set, you will hear sound only while actually
receiving signals. The higher the selected squelch
level, the stronger the signals must be to receive.
The appropriate squelch level depends on the
ambient RF noise conditions.
Turn the SQL control when there are no signals
present to select the squelch level at which the
background noise is just eliminated; the green LED
will turn off. Many ham operators prefer leaving the
SQL control fully counterclockwise unless operating
on a full-carrier mode such as FM. The squelch
level for the main transceiver is preset at the factory
to approximately the 9 o’clock position for FM and 11
o’clock for SSB and AM.
NAR
1 REC 2 REC
5 RF.G
0 OFF
8
3 REC
9
4
7
TX MONI
6
DELAY
HF/50MHz ALL MODE TRANSCEIVER TS-480
CLR
STEP SG.SEL
CW.T
F.LOCK
M/V
SPLIT
M VFO
M.IN
TF-SET
MULTI
IF
SHIFT
AF SQL
PF
AT
CH1 CH2 CH3
PWR
MIC KEY
VOX
PROC
AGC
ENT
A / B
A=B
MODE
MHz
QMI
QMR
MENU
MTR
NB/T
ANT 1/2
FINE SCAN
DNL
BC
NR FIL
RIT
XIT
CL
ATT/PRE
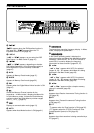
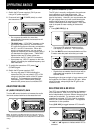
SELECTING A FREQUENCY
Turn the Tuning control clockwise or press Mic [UP]
to increase the frequency. Turn the Tuning control
counterclockwise or press Mic [DWN] to decrease the
frequency.
NAR
1 REC 2 REC
5 RF.G
0 OFF
8
3 REC
9
4
7
TX MONI
6
DELAY
HF/50MHz ALL MODE TRANSCEIVER TS-480
CLR
STEP SG.SEL
CW.T
F.LOCK
M/V
SPLIT
M VFO
M.IN
TF-SET
MULTI
IF
SHIFT
AF SQL
PF
AT
CH1 CH2 CH3
PWR
MIC KEY
VOX
PROC
AGC
ENT
A / B
A=B
MODE
MHz
QMI
QMR
MENU
MTR
NB/T
ANT 1/2
FINE SCAN
DNL
BC
NR FIL
RIT
XIT
CL
ATT/PRE
You may prefer directly entering a frequency using
the numeric keypad if the desired frequency is far
from the current frequency. Press [ENT], then press
the numeric keys as necessary. For details, refer to
“Direct Frequency Entry” {page 34}.
NAR
1 REC 2 REC
5 RF.G
0 OFF
8
3 REC
9
4
7
TX MONI
6
DELAY
HF/50MHz ALL MODE TRANSCEIVER TS-480
CLR
STEP SG.SEL
CW.T
F.LOCK
M/V
SPLIT
M VFO
M.IN
TF-SET
MULTI
IF
SHIFT
AF SQL
PF
AT
CH1 CH2 CH3
PWR
MIC KEY
VOX
PROC
AGC
ENT
A / B
A=B
MODE
MHz
QMI
QMR
MENU
MTR
NB/T
ANT 1/2
FINE SCAN
DNL
BC
NR FIL
RIT
XIT
CL
ATT/PRE
1 REC 2 REC
5 RF.G
0 OFF
8
3 REC
9
4
7
TX MONI
6
DELAY
CLR
CH1 CH2 CH3
PWR
MIC KEY
VOX
PROC
AGC
ENT
MTR
NB/T
This transceiver provides many other methods for
quickly selecting a frequency. For further information,
refer to “SELECTING YOUR FREQUENCY”
{page 34}.