


65
13 OPERATOR CONVENIENCES
TX MONITOR
TX monitor allows you to monitor the on-going
transmission sound. This is convenient when you
want to check the modulation sound quality of the
transmission. In FSK mode, you can monitor the FSK
signal that the transceiver is transmitting.
1 Press [PWR/ 4/ TX MON] (1 s).
2 The current TX monitor setting appears on the
sub-display.
3 Turn the MULTI control to select the monitor
sound level from “oFF”, and “1” to “9”.
4 Press [MTR/ CLR] to store the selected TX
monitor level.
Note:
◆
We recommend you use headphones when you monitor SSB,
AM, or FM mode, in order to avoid howling.
◆
The CW transmission signal cannot be monitored using the TX
monitor function. Use the TX sidetone function to monitor CW
transmissions (Menu Nos. 13 and 34).
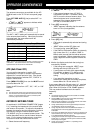
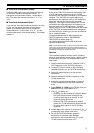
TX POWER
You can adjust the transmission output power by
pressing [PWR/ 4/ TX MONI] and turning the MULTI
control. If more precise power adjustment is
required, access Menu No. 21 and select “on”. When
this function is activated, the power adjustment steps
change as shown in the table below.
TS-480SAT
dnaB edoM
12.oNuneM
FFO
12.oNuneM
NO
dnabFH
/WC/BSS
KSF/MF
W001~5
5fospetsni
W001~5
1fospetsni
MA
W52~5
5fospetsni
W52~5
1fospetsni
zHM05
/WC/BSS
KSF/MF
W001~5
5fospetsni
W001~5
1fospetsni
MA
W52~5
5fospetsni
W52~5
1fospetsni
TS-480HX
dnaB edoM
12.oNuneM
FFO
12.oNuneM
NO
dnabFH
/WC/BSS
KSF/MF
W002~5
5fospetsni
W002~5
1fospetsni
MA
W05~5
5fospetsni
W05~5
1fospetsni
zHM05
/WC/BSS
KSF/MF
W001~5
5fospetsni
W001~5
1fospetsni
MA
W52~5
5fospetsni
W52~5
1fospetsni
Note:
◆
The output power settings are stored independently for HF and
50 MHz. As shown in the table above, you can also store
different output power settings for AM and other modes for HF
bands and the 50 MHz band.
◆
If the TS-480HX transceiver is connected to the AT-300 external
antenna tuner, the TX power is automatically reduced to 100 W
(AM mode: 25 W).
TIME-OUT TIMER
The Time-out Timer limits the time of each
transmission. It is also useful to prevent a long
accidental transmission.
1 Press [MENU/ F.LOCK], then turn the MULTI
control to access Menu No. 22.
2 Press [ ]/ [ ] to select “oFF”, “3”, “5”, “10”, “20”, or
“30” minutes.
3 Press [MENU/ F.LOCK] to store the settings and
exit Menu mode.
TRANSVERTER
If you have a transverter that converts the TS-480
operating frequencies to other frequencies, you can
use this TS-480 transceiver as a transverter exciter.
Consult the instruction manual that came with the
transverter for interfacing to the TS-480 transceiver.
■ Frequency Display
1 Connect the transverter to the ANT 1 or ANT 2
connector from the TX/ RX unit.
2 Select the exciter operating frequency on the
transceiver.
• The transverter will use this frequency as
the reference for converting frequencies.
3 Access Menu No. 23, and select “on”.
• The output power is automatically set to the
lowest power for that frequency (default).
Refer to “TX POWER” {below}.
4 Press [MENU/ F.LOCK] to store the setting
and exit the Menu mode.
5 Press [ENT], then set the target converting
frequency using the numeric keys.
6 Press [ENT] to complete the entry.
7 The transceiver displays the target transverter
frequency instead of the actual operating
frequency.
Note:
When using a transverter, not all the functions of this
transceiver are available.
■ Transmission Output Power
If Menu No. 23 is selected “on” {above}, the
transceiver automatically decreases the output
power to 5 watts. However, if you do not wish to
decrease the output power, you can turn this
function OFF. Access Menu No. 24 and select
“oFF”. The transceiver transmits at full power
even if Menu No. 23 is ON {above}.