


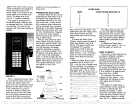
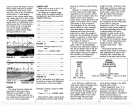
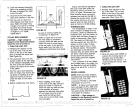

place
near the
top
of the chart
paper.
A zero
adjust
control has
been
placed
on the back
inside
wall of the X-1 6 near the
upper
left hand corner so that the zero
line
position may
be
adjusted
on
the
paper.
Open
the case front and look for
the decal marked "ZERO
ADJUST". You
may
have to
pull
the
paper transport assembly
down to see the decal for the first
time. Push the
transport
closed
and turn on the unit.
(CAUTION
—
Keep
hands
away
from the
stylus
belt and
stylus. High
volt-
age
is
present.)
Insert a 6-8'
long
screwdriver
with a l/g" blade into the zero
adjust
hole and rotate the control
until the zero line is at the desired
position. (Note:
this
may
also be
adjusted
with the unit
turned
OFF.)
Adjust
the
control,
then remove
the screwdriver and turn
power
back ON.
Repeat
until the zero
line is in the desired
position.
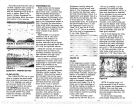
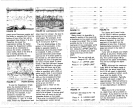
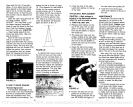
IV HOW TO READ GRAPHS
'rched
Signatures"
A remarkable
advantage
of the
X-16 is that it can record individual
fish with a characteristic arched
mark that
separates
them from
their
stationary surroundings.
The
reason for
this is shown on
page
10.
(The
distance to a fish when it
moves into
the sonar's cone of
sound is shown as "A"
in
Figure
22).
When the
fish has moved to
the center of the
cone,
the dis-
tance to it will be
shorter,
(line
"B"),
and as it
moves out of the
cone,
the distance will
increase
again
as shown in
line "C".
8. Close
the front of the case.
Latch both catches
on the
top
of the case.
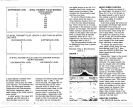
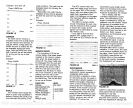
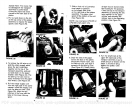
STYLUS BELT REPLACEMENT
CAUTION
—
High voltage
is
present
in the electronic section
when the unit is turned on.
1.
TURN THE UNIT OFF.
2.
Release both catches on
the
top
of the case. Pull out and
down
on the
top
of the case
front and the
platen
to
expose
the
stylus
belt.
3. The
stylus
belt rides over two
pulleys
located at
the
right edge
of the
transport
assembly.
Move
the front of the
belt DOWN to
position
the
stylus
at the center
of the
platen.
4.
Grasp
the belt at the
stylus
holder with the
thumb and fore-
finger
and move it
gently
to the
left while
pushing
the belt off
the
pulleys
with the other
finger.
(See Figure 37.)
5. Position the new belt on
the
pulleys by reversing
the
pro-
cedure used to remove
the old
one. BE SURE the
fingers
of
the new
stylus
are
pointed
UP.
6. Close the front of the
case.
Latch both catches
at the
top
of
the unit.
MAINTENANCE
Remember,
the
stylus may
be
damaged
if it is in front of the
platen
when the
transport
assem-
bly
is
pulled
down.
Always
move
the
stylus
to'the back side of the
transport
assembly
when
chang-
ing
the
paper.
The
stylus
belt
should be rotated
down to remove
the
stylus.
Never rotate
the
stylus
belt
up.
Black carbon
dust is created
during
the
recording process.
Use
a
soft,
oil-free
rag
to
clean the
viewing
door and
transport
assem-
bly.
Low
pressure compressed
air
may
be used to blow dust out
of
the case and
away
from
moving
parts
if
the air is
dry
and
free of oil.
After
every
five rolls of
paper,
the
stylus
belt and
pulleys
it rides
on should be
wiped
clean
with
a
soft
rag
moistened with
alcohol to
remove carbon dust.
All mechanical connections
should be checked
periodically
to
be sure
they
haven't worked loose.
Do
not
apply any type
of lubri-
cant to the motors or
gear
trains.
High voltage
is
present
in the
transmitter section when the unit
is on.
No
attempt
should be made
by any
unauthorized
person
to
modify
or
repair
the electronic
section.
If
corrosion should occur at the
power plug,
fuse
holder,
power
cord
splices,
or
battery
connec-
tions,
clean as
required
and check
to make sure that
good
contact is
being
made at all
terminations.
The face of the
transducer,
if
exposed
to the
water,
should be
FIGURE 22
If
a
partial
arch occurs most of
the time
on
your unit,
(the
mark
curves
up,
but
not back
down,
or
vice-versa)
it is because the trans-
ducer is not
pointed straight
down.
If
your
transducer is mounted on
the
transom,
adjust
the transducer
until the fish show the
distinctive
arched
signature.
This
may
take
some trial and error until the
correct
mounting
is
achieved.
FIGURE 21
a
:4rwt:rr:
-'
,-,t
-
-7' _i'"-
-.
-
____
,— fl.8
r——r
U E1-—
D2rt-z----- LUWRSS
FIGURE 23
FIGURE 37
12 17
PDF compression, OCR, web-optimization with CVISION's PdfCompressor