


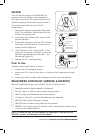

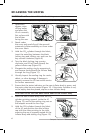
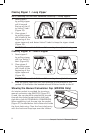
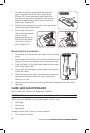

10. While pressing firmly onto the inflator
body, turn the black locking ring
clockwise to the locked position, and
pull on the inflator cap to ensure
it is locked onto the inflator body
(Figure 14).
11. Ensure that the status indicator on the
new inflator cap is green, the pull-
to-inflate lanyard is present, and the
locking ring is locked.
12. To test for leakage, inflate the LP
using the oral inflator tube – see Inflating. To avoid damage to the LP
do not use a compressor (the maximum pressure should not exceed 2
psi). After two hours there should be no noticeable drop in pressure in
the LP.
13. Deflate and repack the LP – see Deflating, and Repacking.
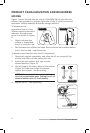
RE-ARMING THE MD3091
CAUTION: The LP must be deflated before being re-armed.
NOTE: An MA7170 re-arming kit is required for this procedure.
CAUTION: Follow the steps below in the exact sequence described.
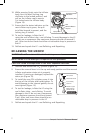
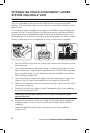
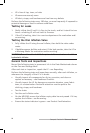
1. Unscrew and discard the CO
2
cylinder (Figure 15).
2. Ensure the manual lever is in the up and ready position and the manual
inflator mechanism status pin is properly
installed. If missing or damaged, replace the
status pin (Figure 15).
3. To install the new CO
2
cylinder, screw it into
the top of the inflator and hand-tighten. To
avoid damage to the internal gasket, do not
over-tighten (Figure 15).
4. To test for leakage, inflate the LP using the
oral inflator tube – see Inflating. To avoid
damage to the LP do not use a compressor
(the maximum pressure should not exceed
2 psi). After two hours there should be no
noticeable drop in pressure in the LP.
5. Deflate and repack the LP – see Deflating, and Repacking.
Status
Indicator
Hydrostatic Water
Inlet Valve
Manual Ination
Lanyard
Beaded Manual
Ination Handle
Tabs
Black Locking Ring
Expiry Date
FiGURE 14
CO2 Cylinder
Inator Mechanism
Up-and-Ready
Status Pin
Ination Lanyard
Beaded Manual
Ination Handle
FiGURE 15
Compact Tactical LP Owners Manual
7