


2 – QLA2340/2340L
FCode
FC2354601-00 A 2-17
If there were not at least 1.7 GB free on this disk, you would need to create
a partition on the new bootable disk large enough to hold the largest
temporary saveset files plus the largest used space on a partition. In this
example, it would be a 3.2 GB (1.6 GB+1.6 GB) partition.
2. Use the format command to create, label, and format partitions on the new
bootable disk. These partitions must be able to contain the contents of your
temporary saveset files. If you are not familiar with the format command,
refer to the Solaris documentation.
WARNING!!
Misusing the format command can destroy the data on your
current disk drives.
a. At the root prompt, type format.
b. A list of available hard disks displays. Specify the disk.
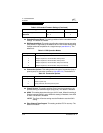
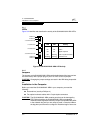
c. At the format prompt, type partition.
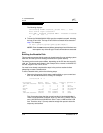
d. At the partition prompt, type print. The partition table displays, as in
the following example.
e. At the partition prompt, type label. Enter the label.
f. At the label prompt, type quit.
g. Type quit until the system prompt displays.
3. To create the file system, use the newfs command. For example:
newfs -v /dev/rdsk/c3t130d0s0
NOTE: The target device ID (t130) is in decimal. The hexadecimal value
for the target ID is used in the boot command line shown in step 11.
4. Mount the boot partition to the /mnt mount point. For example:
mount /dev/dsk/c3t130d0s0 /mnt
5. Change to the root partition mount point directory. For example:
cd /mnt
Part
0
1
2
3
4
5
6
7
Tag
root
swap
backup
unassigned
unassigned
unassigned
unassigned
unassigned
Flag
wm
wu
wu
wm
wm
wm
wm
wm
Cylinders
0 - 8738
8739 - 9188
0 - 9201
0
0
0
0
0
Size
4.00GB
210.94MB
4.21GB
0
0
0
0
0
Blocks
(8739/0/0) 8389440
(450/0/0) 432000
(9202/0/0) 8833920
(0/0/0) 0
(0/0/0) 0
(0/0/0) 0
(0/0/0) 0
(0/0/0) 0