


6.4 HANDLING TIPS
How your customers treat their regulators will directly influence the unit’s function and
durability. Following are a few tips that you can pass on to your customers to help assure the
durability of their Sherwood Scuba regulator.
A. Pre-Dive Checks
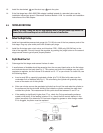
1. Check the hoses and hose connections for cuts, abrasions or other signs of damage before
mounting the regulator on the tank valve. Slide the hose protectors back to inspect the areas of
the hose normally covered. Be sure all hose connections are tight.
2. Too prevent a common source of internal corrosion and contamination of the Dry Air Bleed
System, AL
WAYS turn the tank air valve on briefly before mounting the regulator. Many valve
contain contaminated water in the outlet because of rain or splashing.
3. After mounting the regulator first stage, but before turning on the tank air valve, check to make
sure that the yoke nut or DIN connection is tight and the regulator body is aligned properly, with
no kinks in the hoses.
4. Turn the tank valve on
slowly and listen for leaks. If any leaks are found, replace or repair parts
as recommended.
5.
Never lift the tank/BCD assembly by the regulator or hoses.
6. Surface-test the regulator by breathing lightly through the mouthpiece. Depressing the purge
button above the water’s surface is not meaningful an appropriate method for testing the func-
tion of the regulator.
B. Post-Dive Care
1. After the dive, blow all water out of the dust cap with clean dry air and place the cap securely
on the regulator inlet. On multiple tank dives, use great care to keep salt water out of the
regulator inlet when tanks are changed. Briefly release air from the valve before mounting the
regulator on the valve. Neglecting thesesimple procedures is the greatest cause of corrosion
and wear in scuba regulators. When used properly, Sherwood’s exclusive Dry Air Bleed System
keeps all other water-borne contamination out of the first stage body.
2. With the dust cap securely in place, rinse the first and second stages in
clean fresh water.
DO NOT depress the purge button before or during rinsing since this may introduce water into
the second stage and the low pressure hose. Shake or blow all excess water from the second
stage and allow the entire regulator to air-dry before storing.
3. Store the regulator in a clean bag or storage box, away from sunlight, excessive heat and
humidity.
22
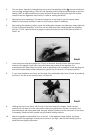
NOTE
: A tiny stream of air bubbles escaping from a small black valve on the first stage indicates that the
Dry Air Bleed System is working. The amount of air used is negligible (13 - 27 cc/min.). Check the system
periodically (see Section 4.3B in this manual), particularly after servicing, to ensure that there is some air
escaping from the black one-way bleed valve. If no air is escaping from the valve when air pressure is applied
to the first stage, have the regulator inspected.