


5-14
Chapter 5: Software support
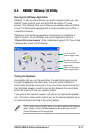
Follow these steps to install the hard disks for RAID configuration.
1. Install the Serial ATA hard disks into the drive bays.
2. Connect one Serial ATA HDD to each Serial ATA connector, using
separate serial ATA cables.
4. Connect the power cable to the power connector on each drive.
5. Make sure that the Serial ATA jumpers are set to enabled. See “2.7
Jumpers, Serial ATA Setting (3-pin SATA_EN1)” for more detailed
information on jumper settings.
6. Proceed to 5.9.2 for the next procedure.
5.5.2 Creating and Deleting RAID sets
Creating and deleting RAID sets is a built-in function found in the BIOS.
The following sub-sections describes how to use the RAID Configuration
Utility.
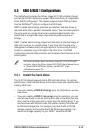
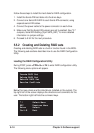
During POST, press <CTRL+S> or F4 to enter RAID configuration utility.
The following menu options will appear.
Below this menu items are the listed drives installed on the system. The
top right half of the screen displays the directions and comments for the
user. The bottom right half lists the command keys.
Loading the RAID Configuration Utility
Create RAID Set
Delete RAID Set
Rebuild RAID Set
Resolve Conflicts
↑ ↓ Select Menu
ESC Previous Menu
Enter Select
Ctrl-E Exit