


ASUS A7N8X-E Deluxe motherboard
5-15
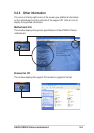
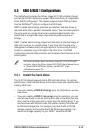
Creating RAID Sets
1. Select “Create RAID Set”
2. Choose either a “Striped” or “Mirrored” RAID Set.
3. Select if you want the utility to Auto Configure the RAID Set or if you
want to manually configure the RAID set. For Striped Sets, you can
change the chunk size. For Mirrored Sets, you assign which is the
Source and Target drives, as well as if you want a Disk Copy.
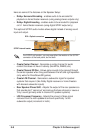
• What is a chunk? The chunk size is the “stripe” on each disk. It is
the unit of storage equivalent to one stripe on a RAID 0 set.
Available chunk sizes: [2] [4] [8] [16] [32] [64] [128]
• When manually setting the chunk size for your RAID set, it is
recommended to use the smaller chunk size for server applications
and the larger chunk size for AV applications.
• What is Disk Copy? if the disk assigned as the source disk has
been partitioned and has data stored on it, and a second disk is
added, the data on the source drive can be copied to the
destination drive, so the disks are identical, and all subsequent
data will be written to both drives as a Mirrored set. If, however, the
source disk does not have data stored on it, there is no need for
Disk Copy.
4. The utility will ask “Are You Sure? (Y/N)” before completing the
configuration. Press “Y” to confirm or “N” to go back to the
configuration options.
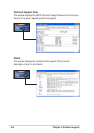
Deleting RAID Sets
1. To remove one or more RAID sets, select “Delete RAID Set”
2. Select desired set and press “Y” when asked “Are You Sure? (Y/N)”
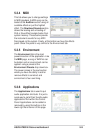
Resolving Conflict
When a RAID set is created, the metadata written to the disk includes
drive connection information (Primary Chanel, Secondary Chanel). If, after
a disk failure, the replacement disk was previously part of a RAID set (or
used in another system), it may have conflicting metadata, specifically in
reference to the drive connection information. If so, this will prohibit the
RAID set from being either created or rebuilt. In order for the RAID set to
function properly, this old metadata must be first overwritten with the new
metadata. To resolve this, select “Resolve Conflict” and the correct
metadata, including the correct drive connection information, will be written
to the replacement disk.