


75
1. Press
MENU
|
MENU
|↓ to
GPS S
ETUP
|
ENT
|
ENT
.
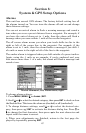
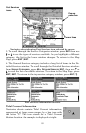
2. A message appears, telling you to move the cursor near the desired
location and press
ENT
. When the message automatically clears, follow
the message instructions.
3. In a moment, your present position marker arrow appears on the
map in the location you selected with the cursor. The IntelliMap 320
will consider that spot as its last known position until changed by ei-
ther a live satellite lock-on or a new simulator location.
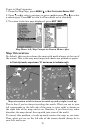
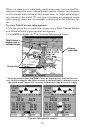
Map Auto Zoom
This receiver has an auto zoom feature that eliminates much of the but-
ton pushing that other brands of GPS receivers force you to make. It
works in conjunction with the navigation features.
First, start navigation to a waypoint. (See the waypoint section for more
information on navigating to a waypoint.) Then, with the auto zoom
mode on, the unit zooms out until the entire course shows, from the pre-
sent position to the destination waypoint. As you travel toward the des-
tination, the IntelliMap 320 automatically begins zooming in — one
zoom range at a time — always keeping the destination on the screen.
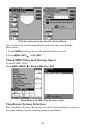
To turn this feature on, from the
M
AP
P
AGE
, press
MENU
|↓ to
A
UTO
Z
OOM
|
ENT
|
EXIT
. Repeat these steps to turn it off.
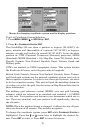
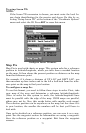
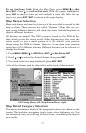
Map Data
This menu lets you turn the map off, if desired (which turns the map
screen into a GPS plotter); turn off or on the pop-up map info boxes;
draw the map boundaries or boxes around the areas of high detail; or
fill land areas with gray. You can also turn on or off Map Overlays,
which display latitude and longitude grid lines or range rings on the
map. This menu lets you select Navionics Maps; for instructions, see
the Navionics Charts entry in this section.
To get to Map Data:
From the Map Page, press
MENU
|↓ to
M
AP
D
ATA
|
ENT
.
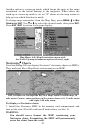
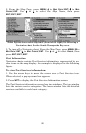
Map Menu, left, Map Data Menu, right.