


4
Installation
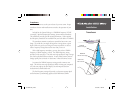
Mounting the Transducer/
Speed Sensor
In-Hull Installation (continued)
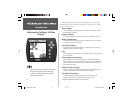
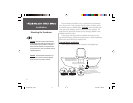
Installing the Transducer:
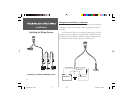
1. Lightly sand the surface of the hull and face of the transducer with 400
grit wet or dry sandpaper.
2. Build a dam using strip caulk about 1/4” tall. Pour about 1/8” of 2-part,
slow cure epoxy in the dam. Place the transducer in the epoxy, turning
the transducer to work out any air bubbles.
3. Weight the transducer in place and allow to cure for 24 hours.
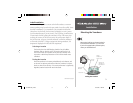
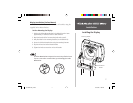
Speed Sensor Installation
The speed sensor should be mounted as near the center of the boat
as possible. Like the transducer, for the speed sensor to operate properly,
it should be located in non-turbulent water. Follow the directions in the
speed sensor installation instructions to assemble the speed sensor with
the mounting bracket, drill holes in the transom, mount the assembly and
route the cable.
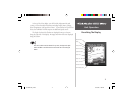
Installing the Transducer
OK
Adjust the speed sensor so it is parallel with the bottom
of the boat. If the speed sensor is not adjusted properly,
the sonar may experience inaccurate or degraded speed
readings.
Strip Caulk or
RTV Sealer
Slow cure
2-part epoxy
Apply twisting motion
to eliminate any
trapped air bubbles
Weight transducer in place
for at least 24 hours
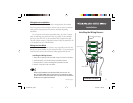
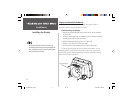
Drill a 3/4” hole well above the water line.
Coat the inside of the hole with Marine Sealant.
Position Cable Clamps about one-third of
the distance from the hole to the transducer.
Drill 1/8” pilot holes 3/8” deep for the mounting screws.
Coat the screws with Marine Sealant before installing them.
190-00200-00_B.indd 02/19/02, 11:28 AM4