


4 308639
Installation
General Information
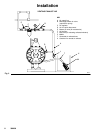
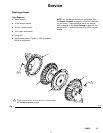
D The Typical Installation shown in Fig. 2 is only a
guide for selecting and installing system
components. Contact your Graco distributor for
assistance in planning a system to suit your needs.
D Always use genuine Graco parts and accessories.
D Reference numbers and letters in parentheses refer
to the callouts in the figures and in the Parts
Drawing on page 22 and the Parts Lists on pages
23 and 24.
HAZARDOUS FLUIDS
To reduce the risk of serious injury,
splashing in the eyes or on the skin, and
toxic fluid spills, never move or lift a
pump under pressure. If dropped, the fluid section
could rupture. Always follow the Pressure Relief
Procedure on page 9 before you move or lift the
pump.
WARNING
D The pump is very heavy. If it must be moved, have
two people lift the pump by grasping the outlet
manifold (50). See the Parts Drawing on page 22.
Use a compatible thread sealant on all male threads.
Tighten all connections firmly to avoid air or fluid leaks.
CAUTION
To avoid pump damage, do not overtighten the
fittings to the pump.
Tightening Screws Before First Use
Before using the pump for the first time, check and
retorque all external fasteners. See Torque
Sequence, page 25. After the first day of operation,
retorque the fasteners. Although pump use varies, a
general guideline is to retorque fasteners every two
months.
Grounding
WARNING
ELECTRIC SHOCK HAZARD
This pump must be grounded. The
steps for grounding may differ from the
way you ground other pumps. Read and
carefully follow the grounding instructions below
before you operate the pump.
To reduce the risk of static sparking, ground the pump
and all other equipment used or located in the pumping
area. Check your local electrical code for detailed
grounding instructions for your area and type of
equipment.
Ground all of this equipment:
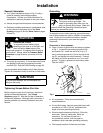
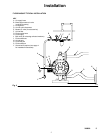
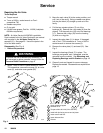
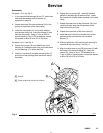
D Pump: Connect a ground wire and clamp as shown
in Fig. 1. Loosen the grounding lug locknut (W)
and washer (X). Insert one end of a 12 ga (1.5
mm@) minimum ground wire (Y) into the slot in the
lug (Z), and tighten the locknut securely. Connect
the clamp end of the ground wire to a true earth
ground. To order a ground wire and clamp, order
Part No. 222011.
Fig. 1
Y
W
X
Z
06318
D Air compressor: Follow the manufacturer’s
recommendations.
D Air and fluid hoses: Use only grounded hoses with
a maximum of 500 ft (150 m) combined hose
length to ensure grounding continuity.
D All solvent pails used when flushing: Follow the
local code. Use only metal pails, which are
conductive. Do not place the pail on a
non-conductive surface, such as paper or
cardboard, which interrupts grounding continuity.
D Fluid supply container: Follow the local code.