


28
D. Float Switch Check and Cleaning (auxiliary codes A-2 and later)
1. Float Switch Check
1) Move the power switch to the "OFF" position, then unplug the unit from the electrical
outlet.
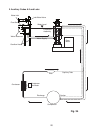
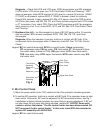
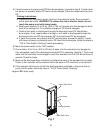
2) Remove the upper rear panel. See Fig. 4.
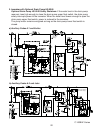
3) Remove the clamp securing the drain plug, then lower the drain hose into a container.
Remove the drain plug to drain the water from the evaporator assembly and reservoir.
4) After all of the water has drained, replace the drain hose, drain plug, and drain clamp in
their correct positions.
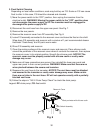
5) Remove the front panel and louver. Remove the screws securing the control box, then
gently pull out the control box. Remove the control box cover.
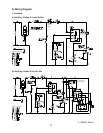
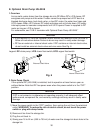
6) At WCR, check continuity between terminal #8 common (BK wire) and terminal #6 UF/S
(R wire). Next, check continuity between terminal #8 common (BK wire) and terminal
#4 LF/S (BU wire). If both are open, continue to step 7. If either are closed, follow the
steps in "IV.D.2. Float Switch Cleaning." After cleaning F/S, check UF/S and LF/S again.
Replace if necessary.
7) Plug the unit into the electrical outlet, then move the power switch to the "ON" position
and let the reservoir ll.
8) Once the reservoir is full and GM starts, move the power switch to the "OFF" position.
9) Unplug the unit from the electrical outlet.
10) At WCR, check continuity between terminal #8 common (BK wire) and terminal #6 UF/S
(R wire). Next, check continuity between terminal #8 common (BK wire) and terminal
#4 LF/S (BU wire). If both are closed, continue to step 11. If either are open, follow the
steps in "IV.D.2. Float Switch Cleaning." After cleaning F/S, check UF/S and LF/S again.
Replace if necessary.
11) Make sure F/S wires are properly connected to WCR, then replace the control box cover
and control box in their correct positions.
12) Replace the removed parts and panels in the reverse order of which they were removed.
13) Plug the unit into the electrical outlet, then move the power switch to the "ON" position
to start the automatic icemaking process.
Legend: GM–gear motor; LF/S–lower oat switch; UF/S–upper oat switch; WCR–water
control relay