


44
4. Removal and Replacement of Evaporator
NOTICE
• Always install a new drier every time the sealed refrigeration system is opened. Do
not replace the drier until after all other repair or replacement has been made.
• When brazing, protect the drier by using a wet cloth to prevent the drier from
overheating. Do not allow the drier to exceed 250°F (121°C).
1) Move the power switch to the "OFF" position, then unplug the unit from the electrical
outlet.
2) Close the water supply line shut-off valve.
3) Remove all ice from the storage bin.
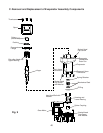
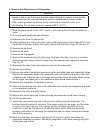
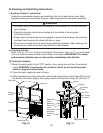
4) While maintaining a hold on the door, remove the hinge stop pin from hinge (B). Pull out
the bottom of the door slightly, then gently remove the door from hinge (A). See Fig. 10.
5) Remove the top panel.
6) Remove the spout.
7) Remove the rear panels.
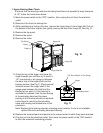
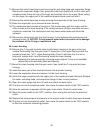
8) Remove the clamp securing the drain plug, then lower the drain hose into a container.
Remove the drain plug to drain the water from the reservoir and evaporator assembly.
See Fig. 12.
9) Disconnect the drain hose and reservoir hose from the evaporator.
10) Remove the packing.
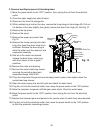
11) Remove the socket head cap screws securing the extruding head and evaporator ange.
Remove the evaporator ange, then grasp the cutter and carefully lift out the cutter and
extruding head. Grasp the top of the auger and carefully lift out the auger. When pulling
out the auger, the upper part of the mechanical seal should come out with it.
12) Remove the evaporator condensate drain pan.
13) Install a temporary tap-line valve on the high side, then recover the refrigerant and store
it in an approved container.
14) Disconnect the inlet and outlet tubing.
15) Remove the socket head cap screws securing the evaporator to the lower housing.
16) Lift off the evaporator.
17) Inspect the mechanical seal and O-ring prior to installing the new evaporator. The
mechanical seal consists of two parts. One moves along with the auger, and the other
is xed on the lower housing. If the contact surfaces of these two parts are worn,
cracked or scratched, the mechanical seal may cause water leaks and should be
replaced. Instructions for removing the mechanical seal and lower housing are located
later in this procedure.
18) Make sure the lower mechanical seal and the O-ring are in place, then place the
evaporator assembly in position. Secure the evaporator to the lower housing using the
socket head cap screws.