


45
19) Replace the tap-line valve with a proper, permanent access valve.
20) Remove the drier, then place the new drier in position.
21) Braze all ttings while purging with nitrogen gas owing at a pressure of 3 to 4 PSIG.
22) Use an electronic leak detector or soap bubbles to check for leaks. Add a trace of
refrigerant to the system (if using an electronic leak detector), and then raise the
pressure using nitrogen gas (140 PSIG). DO NOT use R-134a as a mixture with
pressurized air for leak testing.
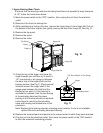
23) Evacuate the system, then charge it with refrigerant. See the nameplate for the required
refrigerant charge.
24) Reattach and secure the reservoir hose, drain hose, and drain plug.
25) Install the auger assembly with the upper part of the mechanical seal attached. Replace
the cutter, extruding head, and evaporator ange in their correct positions.
26) Open the water supply line shut-off valve and check for water leaks.
27) Plug the unit into the electrical outlet, then move the power switch to the "ON" position.
28) Allow the icemaker to operate until the gear motor starts. Check for water leaks.
29) Move the power switch to the "OFF" position, then unplug the unit from the electrical
outlet.
30) Replace the removed parts and panels in the reverse order of which they were removed.
31) Plug the unit into the electrical outlet, then move the power switch to the "ON" position
to start the automatic icemaking process.
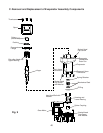
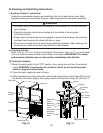
5. Removal and Replacement of Mechanical Seal and Lower Housing
5a. Mechanical Seal
1) Move the power switch to the "OFF" position, then unplug the unit from the electrical
outlet.
2) Close the water supply line shut-off valve.
3) Remove all ice from the storage bin.
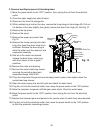
4) While maintaining a hold on the door, remove the hinge stop pin from hinge (B). Pull out
the bottom of the door slightly, then gently remove the door from hinge (A). See Fig. 10.
5) Remove the top panel.
6) Remove the spout.
7) Remove the upper rear panel. See Fig. 12.
8) Remove the clamp securing the drain plug, then lower the drain hose into a container.
Remove the drain plug to drain the water from the reservoir and evaporator assembly.
9) After all of the water has drained, replace the drain hose, drain plug, and drain clamp in
their original positions.
10) Remove the packing.