


32
3. Float Switch Cleaning
Depending on local water conditions, scale may build up on F/S. Scale on F/S can cause
oat to stick. In this case, F/S should be cleaned and checked.
1) Move the power switch to the "OFF" position, then unplug the icemaker from the
electrical outlet. WARNING! Moving the power switch to the "OFF" position does
not de-energize the power supply to DP. The icemaker must be unplugged to
de-energize the power supply to DP.
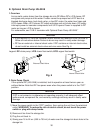
2) Disconnect the vent hose from the upper rear panel. See Fig. 7.
3) Remove the rear panels.
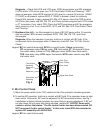
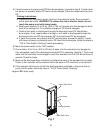
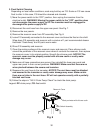
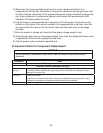
4) Remove the reservoir cover from DP assembly. See Fig. 8.
5) Leave F/S assembly connected to the reservoir cover and leave the oat on the shaft.
Wipe down F/S assembly and reservoir with a mixture of 1 part recommended cleaner
Hoshizaki "Scale Away" and 25 parts warm water.
6) Rinse F/S assembly and reservoir.
7) Clean the mating surfaces of the reservoir cover and reservoir. Place silicone caulk
around the perimeter of the reservoir cover where it contacts the reservoir, then replace
the reservoir cover in its original position. Smooth the silicone caulk. NOTICE!The
reservoir cover must be properly sealed with silicone caulk or costly water
damage may occur.
8) Make sure all hose connections are secure, then reinstall the lower rear panel and
upper rear panel in their correct positions. WARNING! Make sure that there are no
wires pinched between the covers and icemaker.
9) Resecure the vent hose to the icemaker. NOTICE! The vent hose must be attached
and secured to the icemaker or costly water damage may occur. Make certain
there are no kinks in the vent hose. DP will not operate correctly with a partially
blocked vent hose.
10) Follow the steps in "IV.E.2. Drain Pump Check" to check the drain pump.
Legend: DP–drain pump; F/S–oat switch
Fig. 8
Reservoir Cover
Float Switch Assembly
Seal perimeter with silicone caulk