


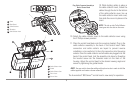

Inside the boat there is often a channel or conduit used for other wiring, this
can be used to route cables. Be sure to route the cable as far as practical
from the antenna cable of VHF radios or tachometer cables to reduce the
possibility of interference. The transducer and GPS receiver cables should
not be cut, and care should be used not to damage the cable insulation.
Basic installation tasks that you must perform include:
• Installing the control head (choosing either gimbal or in-dash
mounting, where in-dash mounting requires a separate purchase)
• Installing the transducer (choosing either the transom mount,
inside the hull mount, or trolling motor mounting method)
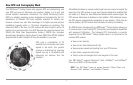
• Installing the GPS Receiver (if included)
• Installing the Temperature Probe Accessory
• Testing the complete installation and locking the transducer position.
NOTE: Accessories may require a separate purchase. You can visit our website at
www.humminbird.com to order these accessories online or contact our
Customer Resource Center at 1-800-633-1468.
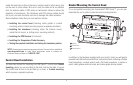
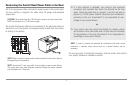
Control Head Installation
You have two choices for mounting your 900 Series™ control head, Gimbal
mounting, where you use a surface on the boat, such as the dash, to mount
the control head so that it can be tilted up or down, or In-dash mounting,
which requires a separate purchase.
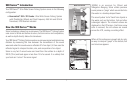
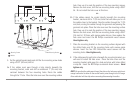
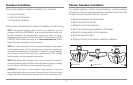
Gimbal Mounting the Control Head
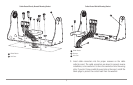
If you are gimbal mounting the Humminbird® 900 Series™, you can pre-
assemble the unit in order to plan the best mounting location.
In addition to the hardware supplied with your control head, you will need a
powered hand drill and various drill bits, various hand tools, including a Phillips
head screwdriver, a socket wrench and a flat head screwdriver, a marker or
pencil, safety glasses and dust mask, and marine-grade silicone sealant.
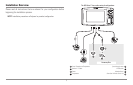
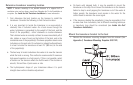
Washer
1
Gimbal Knob
2
Gimbal Bracket
3
1
2
3
6