


Temperature Probe Accessory Installation
The Temperature Probe incorporates
a temperature sensitive probe in a
high-impact plastic housing. The
module is intended for installation on
the transom, and will work well on
almost any boat.
In addition to the parts supplied, you
will need a hand drill with various
bits, marine-grade silicone sealant,
and a Phillips head screwdriver.
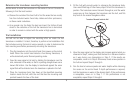
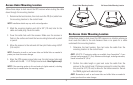
Install the temperature probe accessory
1. Locate an area on the transom of your boat that will be 6” to 8” or
farther from the transducer(s). This area must also maintain contact
with the water, even at high speeds. Do not mount the sensor
directly in front of the propeller or outdrive, and make sure that
there are no protrusions such as ribs, rows of rivets, or transducers
directly forward of the mounting location, as these may affect the
flow of water over the temperature probe.
2. Align the sensor in the clamp, and align it on the transom so that
the lower edge is flush with the hull of the boat, and mark the hole
location.
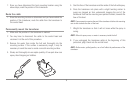
3. On fiberglass hulls, it is best to start with a smaller drill bit and use
progressively larger bits to reduce the chance of chipping or flaking
the outer coating. Drill a 1/8” (3 mm) mounting hole approximately
3/4” (19 mm) deep.
4. Seal the mounting holes with marine-grade silicone sealant, and
attach the sensor to the transom using the screw provided. Hand
tighten only!
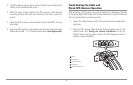
Routing the cable to the control head
1. You may route the cable over the top of the transom, or drill a 5/8”
(16 mm) diameter hole in the transom directly above the sensor and
above the waterline to route cable through. Use the cable clamps
provided to secure the cable to the transom of the boat. If you use
a through-hole, then also use the included escutcheon plate to
dress the hole.
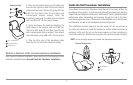
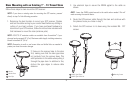
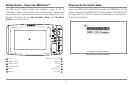
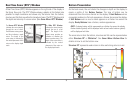
Escutcheon Plate
1
Cable Clamps
2
Sensor Clamp
3
Temp. Sensor
4
1
2
3
4
25