


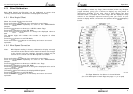


mn100 Dual Digital Display
2
1 - Information
1.1 Introduction
Your Micronet instrument is powered for life by the environment.
Although feature packed and highly visible in all conditions, current
demand is so low, and the supply so efficient, that the solar-powered
display is self sufficient. Combined with other instruments in the
Micronet range this display becomes part of a complete navigational
system.
1.2 Specifications
Height of digits: 20mm (0.8”)
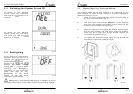
Backlighting: 3 levels with daylight shutoff
System-wide or local control
Power: Solar Powered
300 hrs autonomy by day, 7 nights at brightest
backlighting, 20 nights at economy backlighting
without charge
Units of display: Boat Speed
(knots,kilometers per hour,statute miles per hour)
Distance
(nautical miles, statute miles, kilometers)
Depth
(meters, feet, fathoms)
Wind Speed
(knots, meters per second, Beaufort)
Alarm: Audible Alarm for Depth, Wind and MOB
Weight: 285g (0.63lbs)
Operating Temp.: -100 to +600C (140 to 1400F)
Frequency: 868 MHz or 905 MHz
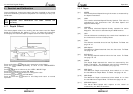
1.3 Power Management and Battery Life
What makes your mn100 instrument possible is Tacktick’s
revolutionary approach to power management. By reducing the
amount of power being used by the electronics and maximizing the
potential of the sun to provide power, a mn100 instrument becomes a
virtually perpetual device.
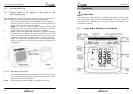
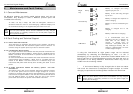
Power status is indicated by two icons on the instrument display:
Battery Level
and Charge Rate
Used together these icons will show the condition of your instrument’s
power supply.
Maintenance and Fault Finding
35
6.2.4 Low Battery Alarm sounds.
The power level is low in the Hull Transmitter, NMEA Interface or Wind
Transmitter. On any Digital Instrument enter Setup and Calibration
mode (Page 18) and scroll through to the Health Chapter. Check the
signal levels of the Transmitters and Interface Box. The signal level
should show a value of greater than 3 to ensure correct operation.
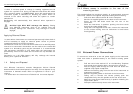
Connect the Hull Transmitter or NMEA Interface to a 9 to 24V power
source for 12 hours minimum to recharge the internal battery. Leave
the Wind Transmitter in bright sunlight for 12 hours minimum to
recharge its internal battery.
6.2.5 Data is shown as dashes.
The information is not been transmitted to the instrument Displays.
There may be lost communication between the Wind Transmitter or
Hull Transmitter and the instrument Displays. On any Digital
instrument enter Setup and Calibration mode (page 18) and scroll
through to the Health Chapter. Check the signal levels of the Hull and
Wind Transmitters. The signal level should show a value of greater than
3 to ensure correct operation.
6.2.6 Compass Transducer rattles and/or splashes.
Good! The fluxgate compass is gimballed in a fluid filled container to
ensure it is not affected by the boats movement in the water.
6.2.7 Compass information displayed on the instrument system does
not agree with the main steering compass.
Ensure that the main steering compass has been swung correctly and is
showing correct information. Ensure that the instrument system has
completed correctly the “Swing” procedure described on page 29. If
there are still differences, look for magnetic objects (loud speakers,
pumps and motors, etc.) close to the Transducer and try mounting the
compass transducer in an alternative location. After changing position
of nearby equipment or the Compass Transducer it will be necessary to
re-swing the compass following the procedure on page 29.
6.2.8 Boat Speed reads 0.
Information being transmitted from the Hull Transmitter is being
received with a Zero value. Check the paddle wheel for fouling, clean it
and make sure it turns easily.
6.2.9 Wind Speed reads 0.
Information being transmitted from the Wind Transmitter is being
received with a Zero value. If the anemometer cups at the top of the
mast are turning and the Wind Speed reads 0 then there is a problem
with your Wind Transmitter.
6.2.11 The Depth Alarm does not sound.
If the actual water depth is shallow and the alarm has not sounded it is
most likely that the alarm is switched off. From any Digital instrument
enter Setup and Calibration mode (page 18) and scroll through to the
Depth Chapter. Ensure the Depth Alarm settings are correct.